IDMS Application User Guide 0.2.5
 Login and Introduction to iDMS Dashboard
Let’s get started,
To access and use the iDMS platform for vehicle servicing and job card, visit the website at
“https://bal-idms.excellonconnect.com/”. This link leads to the login window of the iDMS
platform. On login page follow the below steps,
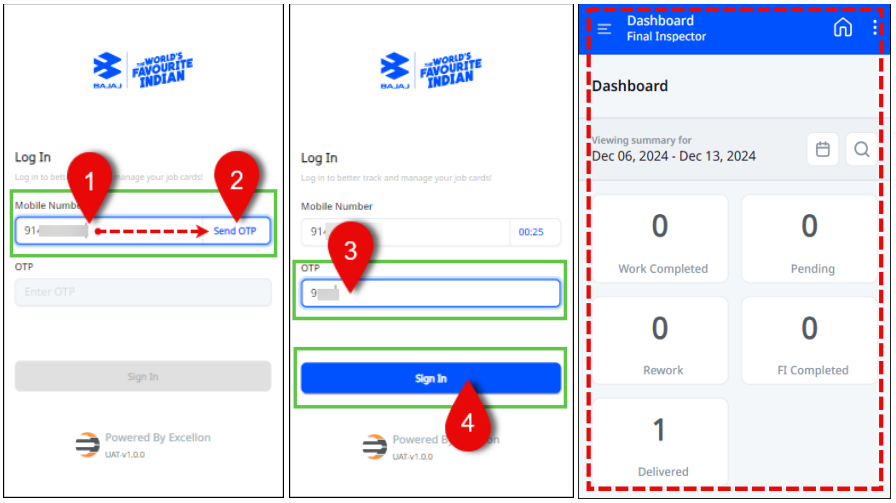
Step 1: Please Enter the valid Mobile Number.
Step 2: Click on the Send OTP button. You will receive the OTP on provided mobile number.
If you do not receive the OTP, you can click Resend OTP to request OTP again.
Step 3: Please Enter the latest OTP that you have received into the designated field.
Step 4: Next click on Sign In. Following these steps will lead the user to the dashboard, as
shown in the last slide below.
The iDMS dashboard offers various functionalities and tabs to assist the user in managing
daily tasks. To gain a better understanding of each tab and its purpose, please follow the steps
below.
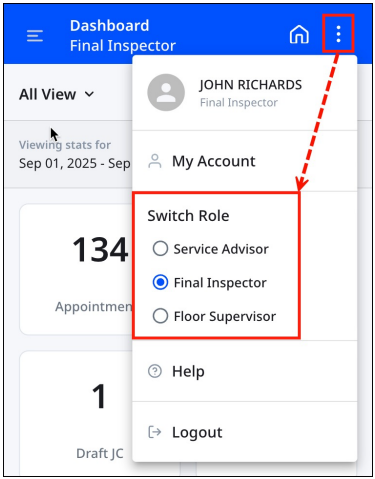
Step 5: Home and My Profile:
Home button allows user to jump on
dashboard menu. With ellipsis/vertical three dots
button
allows user to jump on
dashboard menu. With ellipsis/vertical three dots
button  enables users to access and handle
their user profiles. This includes managing profile
settings, changing passwords, and adjusting
general settings. Users can also switch between
different user roles such as Service Advisor and
Final Inspector, Floor supervisor. Additionally, they
have the option to request ‘Help’ assistance and log
out of the system.
enables users to access and handle
their user profiles. This includes managing profile
settings, changing passwords, and adjusting
general settings. Users can also switch between
different user roles such as Service Advisor and
Final Inspector, Floor supervisor. Additionally, they
have the option to request ‘Help’ assistance and log
out of the system.
Home button
Step 6: Search Icon:  Using Search icon user can search for a specific job card by options
such as VIN number, Registration number, Customer name, Document Number.
Using Search icon user can search for a specific job card by options
such as VIN number, Registration number, Customer name, Document Number.
• When you search for a vehicle using any of the available options, the search results
display all related available transaction documents, such as appointments, draft job
cards, job cards, and service estimates etc.
Note: The search option in the Appointment, Draft Job Cards, Service Estimates, and Job Card
sections is designed to locate requirements specific to each section only. Service advisor must
check the section before locating requirements. Step 7: Calendar:  Please utilize the calendar feature to access information about
appointment and job card status based on the selected date. Users can view data for up to 180
days from the chosen date, including various statuses such as Pending, Draft, Completed, Final
Inspection, Invoice, and Delivery.
Please utilize the calendar feature to access information about
appointment and job card status based on the selected date. Users can view data for up to 180
days from the chosen date, including various statuses such as Pending, Draft, Completed, Final
Inspection, Invoice, and Delivery.
Step 8: Sidebar: The sidebar  allows users to navigate to the dashboard and workshop.
Within the workshop, one can find options to check Appointments, Draft Job Cards, view
Service Estimates, and access Job Cards, check Vehicle History.
allows users to navigate to the dashboard and workshop.
Within the workshop, one can find options to check Appointments, Draft Job Cards, view
Service Estimates, and access Job Cards, check Vehicle History.
Step 9: My View: This section allows users to view and track all tasks assigned to and being
handled by the service advisors currently logged in.
Step 10: All View: View all tasks and their statuses handled by the service advisors following
listed all functions.
Step 11: To schedule new appointments and track
appointment statuses, users can utilize filters for
branch, service type, vehicle, service advisor, and
date.
Step 12: Draft JC: The job cards and their statuses,
including open, closed, converted, and completed,
can be tracked. Before moving to the Service
Estimate status, advisors have the ability to make
changes to open draft job cards.
Step 13: Open JC: To monitor job cards that are
currently in an open status.
Step 14: Work Completed: The listed job cards are
those that have had the work completed and are
now awaiting final inspection.
Step 15: Ready for Invoice: After the final inspection and completion of all work, the status changes to "ready for invoice," signifying that the actual invoice has been generated.
Step 16: Create New Job Card: To create a new appointment and Job Card, simply click on the
"+" sign located in the right bottom corner of the dashboard.
Step 17: Pre JC: Prior to creating a job card while
scheduling an appointment, it is important for
the user to complete the necessary tasks.
Step 18: Estimate: Track job cards with cost
generated estimates.
Step 19: In Progress: Currently being worked on
job cards will appear here.
Step 20: With FI (Final Inspection): The job cards
that are currently waiting for or undergoing final
inspection are tracked at this location.
Step 21: Delivered: After all activities and final
inspections, this function reflects the vehicles
that have been delivered.
This section is designed to manage all job cards and their respective statuses with ease. To
enhance this process and make it more user-centric, kindly go through the following sections.
Add iDMS Shortcut to Mobile Home Screen via Browser (Chrome, Safari, Edge, Firefox)
1. Chrome:
A browser by google,
Step 1: Open google ‘Chrome’ browser on your mobile.
Step 2: Click on the link provided for iDMS web application or copy past the iDMS web application link in search bar of google ‘Chrome’ browser to open the login page of iDMS application.
Step 3: To create the shortcut for iDMS application on mobile home/menu page. Click on the three dots menu provided at upper right corner of the chrome browser.
Step 4: Find and click on ‘Add to Home screen’ option from the list of menus.
Step 5: Click on ‘Install’ option provided on the pop up.
Step 6: On completion of above steps, a shortcut access for iDMS web application will be
available on home screen.
2. Safari:
A browser by Apple (ios).
Step 1: Open ‘Safari’ browser on your iPhone.
Step 2: Click on the link provided for iDMS web application or copy past the iDMS web application link in search bar of ‘Safari’ browser to open the login page of iDMS application.
Step 3: To create the shortcut for iDMS application on mobile home/menu page. Click on the share icon provided at bottom of the safari browser.
Step 4: Find and click on ‘Add to Home screen’ option from the list of menus.
Step 5: Click on ‘Add’ option provided at upper right corner.
Step 6: On completion of above steps, a shortcut access for iDMS web application will be available on home screen.
Step 6: On completion of above steps, a shortcut access for iDMS web application will be available on home screen.
3. Edge:
A browser by Microsoft.
Step 1: Open Microsoft ‘Edge’ browser on your mobile.
Step 2: Click on the link provided for iDMS web application or copy past the iDMS web application link in search bar of ‘Edge’ browser to open the login page of iDMS application.
Step 3: To create the shortcut for iDMS application on mobile home/menu page. Click on the three dots menu provided at right bottom of the fire for browser.
Step 4: Find and click on ‘Add to Phone’ option from the list of menus.
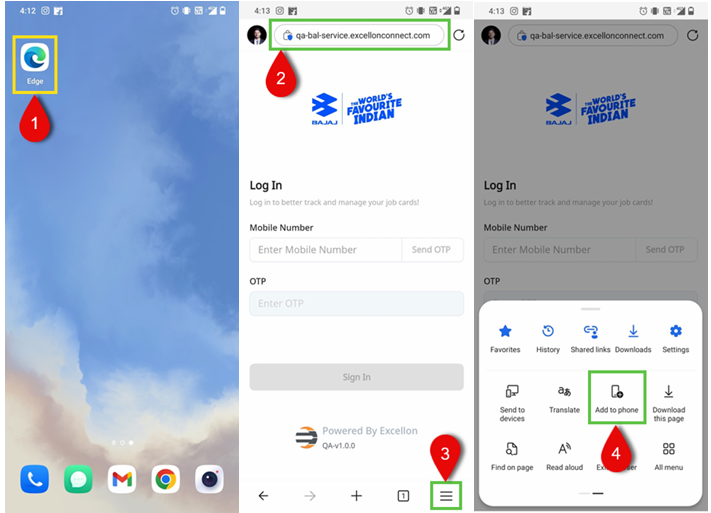
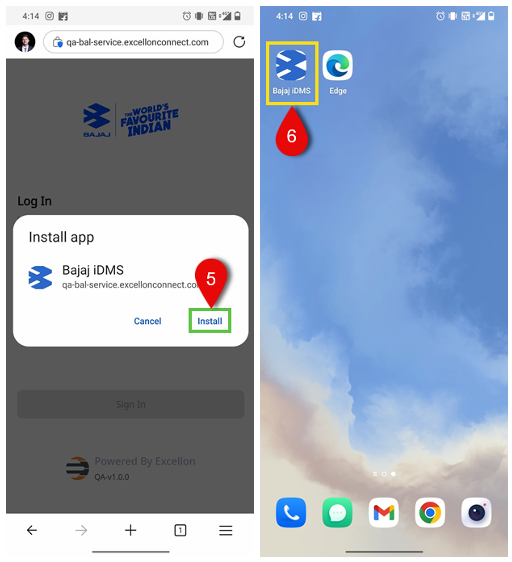
Step 5: Click on ‘Install’ option provided on pop up.
Step 6: On completion of above steps, a shortcut access for iDMS web application will be available on home screen.
4. Firefox: A browser by Mozilla,
Step 1: Open ‘Fire Fox’ browser on your mobile.
Step 2: Click on the link provided for iDMS web application or copy past the iDMS web application link in search bar of ‘Fire Fox’ browser to open the login page of iDMS application.
Step 3: To create the shortcut for iDMS application on mobile home/menu page. Click on the three dots menu provided at right bottom of the fire for browser.
Step 4: Find and click on ‘Add to Home screen’ option from the list of menus.
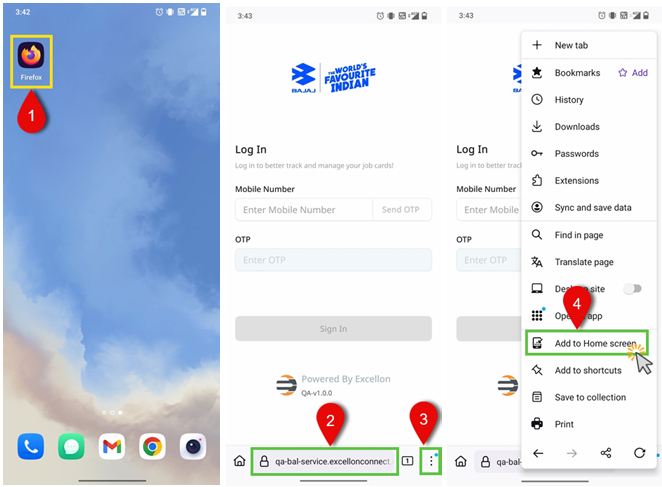
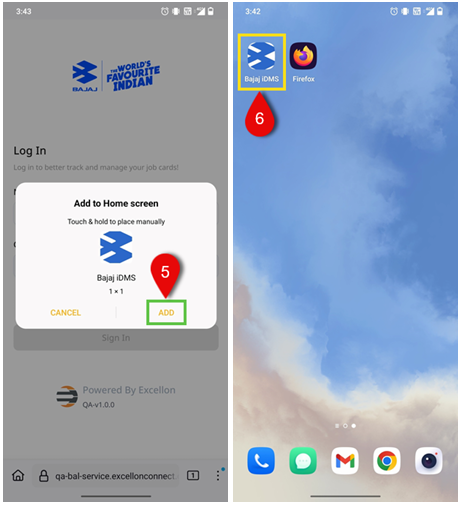
Step 5: Click on ‘Add’ option provided on pop up.
Step 6: On completion of above steps, a shortcut access for iDMS web application will be available on home screen.
Step 1: Open Microsoft ‘Edge’ browser on your mobile.
Step 2: Click on the link provided for iDMS web application or copy past the iDMS web application link in search bar of ‘Edge’ browser to open the login page of iDMS application.
Step 3: To create the shortcut for iDMS application on mobile home/menu page. Click on the three dots menu provided at right bottom of the fire for browser.
Step 4: Find and click on ‘Add to Phone’ option from the list of menus.
Step 5: Click on ‘Install’ option provided on pop up.
Step 6: On completion of above steps, a shortcut access for iDMS web application will be available on home screen.
4. Firefox: A browser by Mozilla,
Step 1: Open ‘Fire Fox’ browser on your mobile.
Step 2: Click on the link provided for iDMS web application or copy past the iDMS web application link in search bar of ‘Fire Fox’ browser to open the login page of iDMS application.
Step 3: To create the shortcut for iDMS application on mobile home/menu page. Click on the three dots menu provided at right bottom of the fire for browser.
Step 4: Find and click on ‘Add to Home screen’ option from the list of menus.
Step 5: Click on ‘Add’ option provided on pop up.
Step 6: On completion of above steps, a shortcut access for iDMS web application will be available on home screen.
Table of Contents
Appointment Schedule Appointments
Creating a job card for vehicles involves prioritizing the scheduling of an appointment. To
ensure simplicity and clarity in understanding, follow the steps below:
Step 1: Upon successfully logging in, the user will
be directed to the dashboard of the iDMS web
application. To access additional features, simply
click on the sidebar located on the left-hand side.
This action will enable navigation to the
'Dashboard' and 'Workshop' dropdown menus.
Step 2: Navigate to the Workshop menu and
choose the first option, Appointment. This will
display the available appointment records for the
advisor.
Step 3: The service advisors can view their own
appointments as well as appointments created by
other service advisors at the service station. This
can be done by selecting the appropriate option in
the dropdown menu. To find out more about 'My
Appointments' and 'All Appointments,' please
refer to Step 17.
Step 4: To create a new appointment, select the 'Create Appointment' tab located at the bottom of the screen.
Step 4: To create a new appointment, select the 'Create Appointment' tab located at the bottom of the screen.
Step 5: In the search field dropdown, the advisor has the option to search for vehicle or
customer details using one of four options: Registration Number (Reg No.), Vehicle
Identification Number (VIN No.), Mobile, or Email.
Step 6 & 7: Please select a field, enter the necessary information, and then click on the search
button.
Step 8, 9 & 10: After a successful search for customer details, the service advisor can access
the customer's profile and basic information. If the customer's primary mobile number is not
registered or available in the system, it needs to be registered as a one-time process. However,
if the primary mobile number is already available in the system and no other changes are
required, then the user can proceed to step 11.
Kindly note that primary mobile number registration is necessary for customers.
• Enter the customer's primary mobile number and select 'Send OTP'. Enter the OTP received in the designated field. If the OTP is not received, select 'Resend OTP', enter the OTP once received, and proceed to confirm. Additionally, if required, the Advisor can add the customer's secondary mobile number by following the above-mentioned steps. Fill in all mandatory details in the provided information fields. Once completed, select the 'Update' button located at the bottom of the screen. This action will take the user to the service details.
• Enter the customer's primary mobile number and select 'Send OTP'. Enter the OTP received in the designated field. If the OTP is not received, select 'Resend OTP', enter the OTP once received, and proceed to confirm. Additionally, if required, the Advisor can add the customer's secondary mobile number by following the above-mentioned steps. Fill in all mandatory details in the provided information fields. Once completed, select the 'Update' button located at the bottom of the screen. This action will take the user to the service details.
Step 11 & 12: Please ensure that the user clicks on the checkbox (11.1) to select and confirm
the vehicle details before creating the job card. Service type options may have been pre-listed,
or it is important for the advisor to select the appropriate one (11.2). Lastly, enter the
'Odometer reading' which is the current vehicle dashboard reading in kilometers (12).
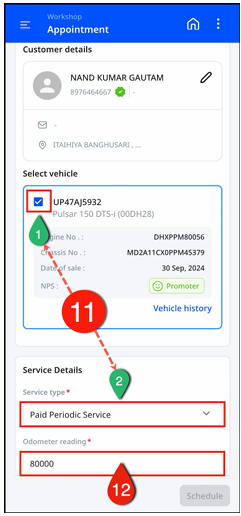
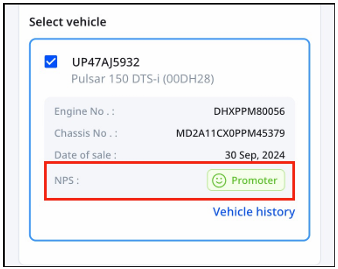
A job card can have one of three Net Promoter Score (NPS) values - Promoter, Passive, or Detractor—based on the customer’s feedback from their most recent dealership service.
Step 13 & 14: Choose the date and time for the appointment based on the customer's and slots availability.
A job card can have one of three Net Promoter Score (NPS) values - Promoter, Passive, or Detractor—based on the customer’s feedback from their most recent dealership service.
Step 13 & 14: Choose the date and time for the appointment based on the customer's and slots availability.
Step 15 & 16: The customer voice window offers a section where user can note or add one
voice recording and up to three images to capture all customer feedback and concerns. To
proceed with scheduling, simply click on the 'Schedule' button located in the bottom right
corner of the screen. Once user does so, a 'Schedule Successfully' popup window will appear.
From there, the user has the option to either create a new appointment for the next available
slot or navigate back to the homepage.
Note: (All required fields marked with an asterisk (*) must be completed prior to scheduling an
appointment.)
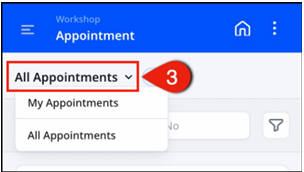
Step 17: After following Step 3 to view user appointments, choose either 'My Appointments'
or 'All Appointments' from the dropdown menu. By selecting 'My Appointments', the user will
only see the appointments self-created.
If the user selects 'All Appointments', the user will be able to view all appointments created by
all service advisors working at the same workstation, along with their respective status.
Step 18: A filter option is available to search for scheduled appointments using different filter
combinations, including Appointment Status, Service Type, Vehicle, and Appointment Date (up
to 180 days).
Step 19: A filter option is available to search for scheduled appointments using different filter
combinations, including Appointment Status, Service Type, Vehicle, and Appointment Date (up
to 180 days). To sort the appointments based on the filters, please select and fill in the
necessary details for the filter options.
Once the user has entered all the required information (1 to 7), click on the 'Apply' button (8).
This will apply the selected filters and sort the appointments accordingly.
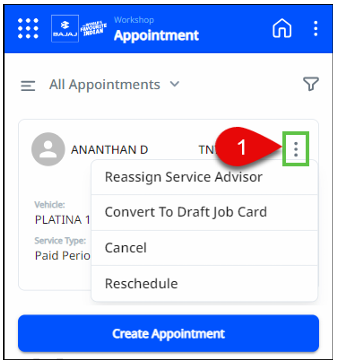
Step 20 & 21: Using the three-dot/ellipsis menu on the schedule, advisors have the ability to
modify appointments by selecting options such as 'Reassign Service Advisor', 'Convert to Draft
Job Card', 'Cancel', or 'Reschedule'. Selecting any of these options will result in a change to
the appointment's status accordingly (20).
Please scroll down to '3. Status in Appointment' for more detailed information on each status.
To connect with customers regarding appointments and concerns, the adviser can simply click
on the phone icon (21).
Appointments to Pre JC
The instructions above provide a guide for service advisors to successfully schedule and track
both 'My Appointments' and 'All Appointments'. To create a job card from existing
appointments, advisors can prepare a Pre JC and a draft job card. In appointments, service
advisors may encounter statuses such as 'Scheduled', 'Pre JC', 'Rescheduled', 'Cancelled', and
more. To create a 'Pre JC' via appointments, follow the steps below:
Step 1, 2 & 3: On successful login, users will immediately be directed to the iDMS web
application's dashboard. To access additional features, simply click on the sidebar located on
the left-hand side of the screen. This will provide access to the ‘Dashboard’ and ‘Workshop’
dropdown menus.
Within the ‘Workshop’ dropdown, select the first option, 'Appointment', to view appointment
records. By choosing ‘My appointments’, advisors can review appointments they have
personally created. In the 'All appointments' section, advisors can also view appointments
created by other service advisors working at the service station.
Step 4: After selecting either "My Appointments" or "All Appointments", the user will find the
relevant appointments. To create a job card for a specific appointment, simply click on it. By
clicking on the desired appointment, the user will be directed to a service details page that
includes the following information: 'Customer Details’, ‘Vehicle Details', 'Service Details',
‘Other Details', 'Date & Time Slot', and 'Customer Voice'.
Step 5 to 8: As a service advisor, the user has the ability to edit existing appointment details if
necessary. Additionally, the user can change ‘Service type’, input real-time 'Odometer
reading', select any applicable 'Campaign', and provide 'Customer Complaint' by uploading
up to 3 photos, a voice recording, or a note in the designated 'Customer Complaint’ section.
Note: It is a must to fill in the ‘Customer Concerns’ details, for Commercial
Vehicle’s job card.
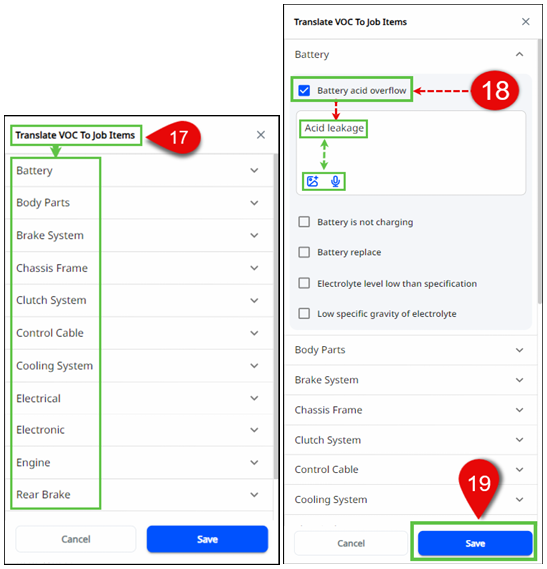
Step 9: 'Translate VOC to job items' section allows users to select job items based on the
customer's voice and concerns.
Steps 10, 11 & 12: Upon selecting "Translate VOC (Voice of Customer) to Job Items," a
dropdown list of specific job items will appear. Here, Advisors can choose the relevant job item
for the customer's complaint and provide the necessary details by typing, adding up to three
images, or recording their voice. It is mandatory to include a comment for each selected
section. If any incorrect uploads occur, Advisors can utilize the delete icon to remove them.
Once all the details have been filled out, simply click on the "Save" button to save the
information.
Note: It is a must to fill in the ‘Translate VOC To Job Items’ details, for Pro-Biking
and Motorcycle Vehicle’s job card.
Step 13: On successfully completing all the steps mentioned above, click on the 'Next' button
located at the bottom of the screen. This action will take the user to the service details page.
Here, the service advisor will have the ability to make changes to the pre-selected 'PM Parts'
and choose job items from the 'Standard Additional Jobs' sections.
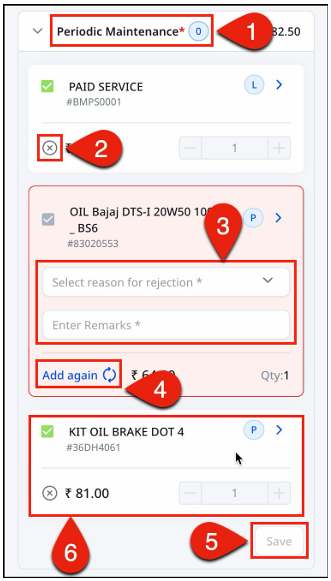
PM Parts
This section contains all pre-selected jobs that will be performed alongside other listed job
items (1). Service Advisors can only remove the pre-selected jobs by clicking on the cross (x)
icon (2). After removing any of the service, a dropdown menu will appear. Please click on
"Select reason for rejection" and choose the appropriate reason. Then, add remarks for the
rejection of PM parts (3). In case if advisor wish to add, recently declined part or labor then,
click on ‘Add Again’ (4). Finally, click the "Save" button to finalize this task (5).
Additionally, this section provides detailed information about each job item with P – Part / L –
Labor tags, their respective code, cost and quantity (6).
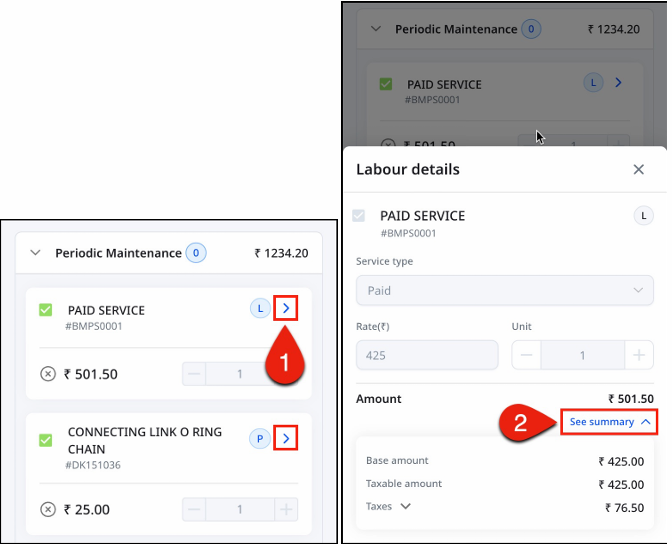
Further to check detailed Part/Labor price break up and applicable tax charges for any of the listed
job items. Click on arrow next to expected part/labor (1). A window will pop up, click on ‘See
summary’ for detailed applied charges (2).
Standard Additional Jobs
In Standard Additional Jobs (1) advisor can select any of listed standard job. Click on Standard
additional job section, select any of the required standard job item (2) from the list scroll down
and click on ‘Save’ button provided at right bottom corner for this task (3).
Additionally, each job item provides detailed information about each Part / Labor with quantity
and their respective cost.
Further to check detailed Part/Labor price break up and applicable tax charges for any of the listed
job items. Click on arrow next to expected part/labor (1). A window will pop up, click on ‘See
summary’ for detailed applied charges (2).
Step 14: Clicking the "Create Pre Jc" button will provide the appearance of a window called
"Draft Job Card." This window marks the transition from the "Draft job card" to the "Job card"
workflow.
Note: Further to convert a ‘Draft job card’ to ‘Job card’ please follow the ‘Job Card’ section,
‘Method 1: Appointment’.
Status in Appointments
Step 1: In the appointments, the service advisor can find several statuses for scheduled
appointments. The meanings of each of these statuses are as listed below:
• Scheduled: The appointment is scheduled for respective time and date.
• Pre JC: The appointment is currently under the Pre JC status.
• Rescheduled: The appointment has been rescheduled with a revised time and/or date.
• Inward: The rescheduled appointments after Pre JC will be in an open status in the draft job card.
• Cancelled: The appointment has been cancelled.
• Closed: The appointment is marked as closed after job card billing.
To make a change in the status of appointments, service advisors can utilize the ellipses/three dots menu.
Upon clicking the three dots, a popup will display offering the following options:
1. Reassign Service Advisor
2. Convert To Draft Job Card
3. Cancel
4. Reschedule
Let’s learn more about each option given in the list in detail:
4. Reschedule
Let’s learn more about each option given in the list in detail:
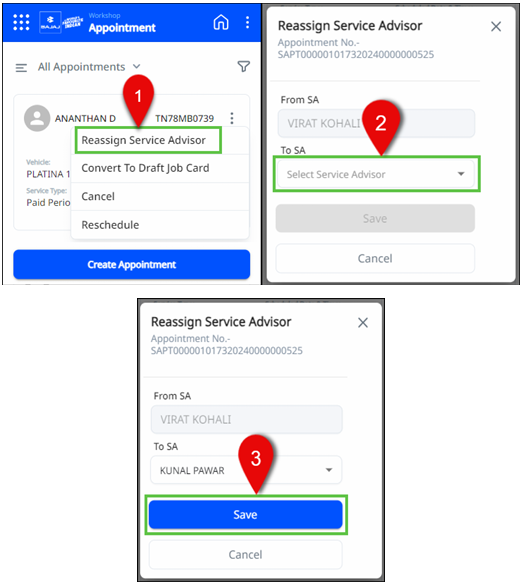
Reassign Service Advisor
Click on first option given in the list (1), This will prompt a reassign service advisor window to
appear. Next, click on the 'To SA' field and select the name of the service advisor to whom the
appointment should be reassigned (2). Finally, click on the save button (3) to save and reassign
the appointment to the selected service advisor.
Convert To Draft Job Card
This option service advisor can create a Pre JC > Draft Job Card > Job Card of scheduled appointment. Follow 1. Appointments to Pre JC to know and learn more about this functionality.
Cancel
To cancel the scheduled appointment, click on the third option in the list (1). A window will appear click on reason and select most suitable and appropriate reason for cancelling appointment (2). Mention a remark for selected appointment cancel reason (3). Check all filed details and click on confirm to cancel the appointment (4). The scheduled appointment is now cancelled.
Reschedule
To reschedule the appointment, click on the last option provided in the list (1). Select the next
appointment date (2) and time slot (3). Add remark for rescheduling the appointment (4) and
click on reschedule (5). Now the appointment is rescheduled to its new date and time.

-: Thank You: -
Job Card
Let’s get started,
creating a job card for a vehicle is an utmost crucial task. A job card encompasses all the
essential information about the vehicle, ranging from service and maintenance details to
specific requirements. To prepare a job card, there are two primary methods are available.
Please scroll down to individual methods to explore further into their respective details and
gain a comprehensive understanding:Method 1: Appointment
Once following the steps for ‘Appointment’, service advisor can create a job card from already created appointment or via the ellipsis/three dots menu present on the upper right corner of the appointment card. Follow the below mentioned steps to create a job card,
Step 1, 2 & 3: Upon successfully logging in to the iDMS web application, the user will be directed to the dashboard. Locate the sidebar on the left-hand side and click on it to proceed. This action will enable access to the 'Dashboard' and 'Workshop' drop-down menus. Within the 'Workshop' drop-down, select the first option labeled 'Appointment'. By doing so, the advisor gains the ability to review appointment records. To specifically view self-created appointments, click on 'My Appointments'. Alternatively, to review all appointments, including those created by other service advisors at the service station, navigate to the 'All Appointments' section.
Step 4, 5 & 6: To create a draft job card, select an appointment card with a status of 'Pre JC', 'Scheduled', or 'Rescheduled'. Click on the ellipses/three dots menu located in the upper right corner of the appointment card (5). A pop-up will appear with four options. Choose the second option, labeled 'Convert To Draft Job Card'. This action will open the 'Draft Job Card' window and display the service details page, which includes 'Customer & Vehicle Details', 'Service Type', 'Odometer Reading', 'Campaign', and 'Customer Voice' information.
Note: Follow step 7 to further create a ’Job Card’ from ‘Scheduled’ appointment.
Table of Contents
Method 2: Job Card
Incase if customer haven’t made any prior appointment. In this scenario service advisors
can always create a new job card. To create a new job card service advisor can follow any one
route out of the two as given below,
Route 1: Using the sidebar with the "Job Card" function.
On successfully login into the iDMS web application, navigate to the sidebar located in the upper left corner of the dashboard (1). Click on the 'Workshop' dropdown and select 'Job Card' (2). This action will take the user to the job card page. Finally, click on 'Create Job Card' located at the bottom of the window (3).
Then follow the further steps, ‘Step 2 & 3’ from Route 2.
Route 2: Using ‘+’ icon on the dashboard. On successfully login into the iDMS web application, click on ‘+’ icon available at the bottom right of the dashboard (1).
Step 1: After successfully logging into the iDMS web application, the user can proceed with posting using either method 1 or method 2 as mentioned above.
Steps 2 & 3: In the search field dropdown, the service advisor can search for vehicle or customer details using four options: Registration Number (Reg No.), Vehicle Identification Number (VIN No.), Mobile Number, and Email (2). Select one of these fields, enter the relevant details, and proceed by clicking the search button (3).
Steps 4a, 4b & 5: Post a successful customer details search, the service advisor can access the customer's profile and basic information. If the customer's primary mobile number is not already registered and available in the system, please follow the one-time registration process. However, if the primary mobile number is already available in the system and no further changes are needed, proceed step 7.
For customers, the registration of a primary mobile number is necessary.
• To enter the customer's primary mobile number, select the designated field and click on 'Send OTP' (4.a). Enter the received OTP in the provided field. If the OTP is not received, click on 'Resend OTP' and enter the OTP in the designated field once received and then proceed to confirm (4.b).
If needed, the Advisor can add the customer's secondary mobile number by following the above-mentioned steps. Ensure that all required details are filled in the provided information fields. Once complete, click on the 'Update' button located at the bottom of the screen (5). This will redirect the user to the service details page.
Steps 6: Please select and confirm the vehicle details by clicking on the provided checkbox to ensure that the job card is created for the same vehicle.
Steps 7 & 8: To access existing rider details or add a new rider, select the 'Rider/Driver' option (8). Click on the '+ Add' button to open the 'Add New Rider' window (9). Ensure all necessary fields are completed to create a new rider profile, including the relationship with the owner, first name, last name, mobile number, OTP, email address, preferred language, and contact preference.
If the rider/driver information is already available and no changes are required, proceed to Step 12.
Steps 9, 10 & 11: To begin, please input the rider's mobile number and select the 'Send OTP' button (9). Once the OTP is received, enter it into the designated field. In case the user doesn’t receive the OTP, the user can choose to resend it by clicking 'Resend OTP'. After receiving the OTP, enter it into the appropriate field and proceed to confirm (10).
Make sure to provide all necessary information in the designated fields for ‘Language and Contact Preference’. Once all the required details are filled in, click on the 'Confirm' button at the bottom of the screen (11).
Rider Details
Once adding rider/driver information with details (1), the service advisor can select the
appropriate rider/driver from a list of riders in case multiple riders/drivers are added for the
same vehicle (2).
To identify the rider who has delivered the vehicle at the service station (3) and to receive notification regarding vehicle servicing (4), click on the rider's name. The selected rider/driver's mobile contact number will be displayed in the CDMS as 'Rider Alternate No.' (5).
Step 12 & 13: In this section, the service advisor has the ability to make edits to the existing appointment details, if necessary. The advisor can also review and edit the pre-filled ‘Service Type’, 'Odometer reading' and make any necessary adjustments (12). Additionally, service advisors can only view assigned ‘Service Advisor’ name and edit, select 'Campaign' details’ (13).
UCN Section
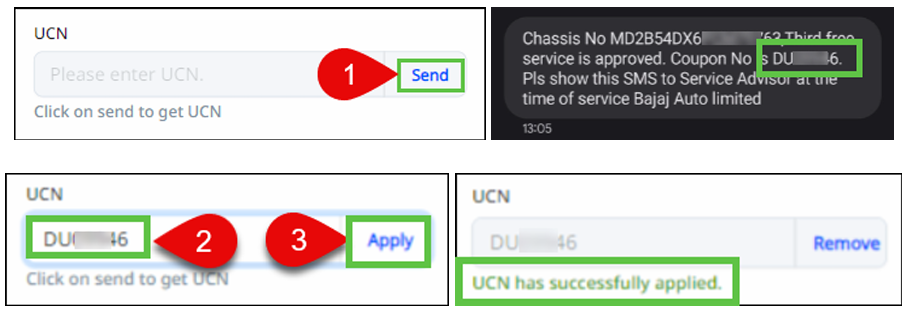
Step 14: In the UCN section, the service advisor has the capability to generate a ‘Unique
Coupon Number’ by clicking the 'Send' button. The designated customer will receive the code
on their registered primary mobile number. Simply input the coupon code in the specified
section and select the 'Apply' button to successfully apply the code. The status of the code will
then be changed to 'applied'.
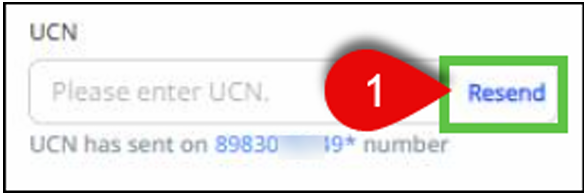
If the coupon code is not received on the customer's primary mobile number, click the 'Resend' button to resend the coupon code.
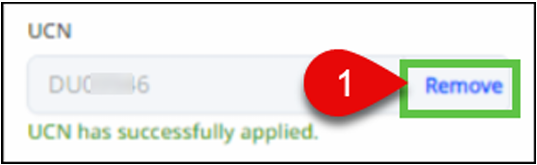
To remove the applied coupon code, simply click on the 'Remove' button if the rider/customer does not wish to use the free servicing coupon at that time. This will remove the coupon code number.
If the coupon code is not received on the customer's primary mobile number, click the 'Resend' button to resend the coupon code.
To remove the applied coupon code, simply click on the 'Remove' button if the rider/customer does not wish to use the free servicing coupon at that time. This will remove the coupon code number.
Customer Concerns
Step 15: The purpose of the 'Customer Concerns' section is to review the pre-filled customer concerns (15). The customer concerns window allows users to note or add voice recordings and images, as well as express their concerns.
Step 16: The 'Translate VOC to Job Items' field allows the service advisor to select and record job items for the job card, based on the customer's concerns and requirements.
Note: It is a must to fill in the ‘Translate VOC To Job Items’ details, for Pro-Biking
and Motorcycle Vehicle job card.
Translate VOC to Job Items
Steps 17, 18 & 19: After selecting 'Translate VOC (voice of customer) to job items', a series of
drop-down menus will appear, containing various job items. Here, the advisor has the option
to choose the customer's complaint as a specific job item. They can then proceed to fill in the
relevant details either by typing, adding up to 3 images, or including a voice recording. It is
mandatory for the advisor to provide a comment for each selected section. If any incorrect
uploads are made, the advisor can easily remove them using the delete icon.
Once all the necessary details have been filled in, the advisor should click on the 'Save' button to save the information. Then click, ‘Next, button present at the bottom of the screen.
Once all the necessary details have been filled in, the advisor should click on the 'Save' button to save the information. Then click, ‘Next, button present at the bottom of the screen.
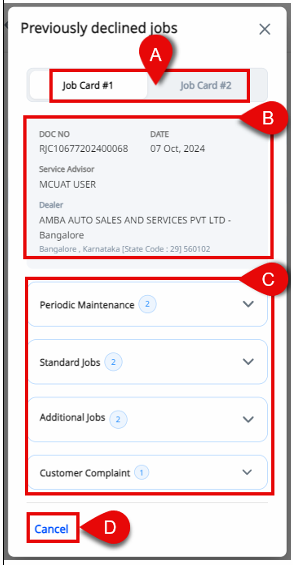
Previously declined Jobs
For regular servicing of a vehicle/chassis that has been serviced more than one times, every
time a pop-up will display a list of previously declined job items in PM parts, standard
additional jobs, and additional jobs. This pop-up suggests the declined items from the past
three job cards for mentioned sections. While creating a new job card, the service advisor can
select and include these previously declined job items for servicing.
Step A: Here, service advisor can choose one between
latest service job cards.
Step B: Upon selecting any of the last job cards, the corresponding job card details such as Document number (DOC NO.), Date, Service advisor name, Dealer details will be available.
Step C: Previously declined job items from Periodic Maintenance (PM) parts, Standard Jobs, Additional Jobs, Customer Complaint are available here. On clicking each section individually service advisor will get chance to check and select job items.
Step D: Once the required changes are saved in above fields click on cross (X) / ‘Cancel’ to move on next field or if there are no changes required in above section then click on cancel for next steps.
To include previously declined job items in service follow the steps given below to,
After following above given step A and step B.
Step 1: Click on any of the section given in above step C to add declined job items for the section.
Step 2: Click on all required check box to include the item in service. Also, To know the reason for declining job item in past servicing click on ‘Reason’.
Step 3: Once all the required items are selected click on ‘Save’ button to include previously declined job items.
After following all above steps 1, 2, 3. Follow above step D for further actions.
Service Details
Steps 20: In the service details, the advisor can include the following:
• Periodic Maintenance (PM Parts)
• Standard Additional Jobs
• Vehicle Pre-check
• Road Test
• Additional Jobs.
Let’s explore and learn more about the functionality of each service details as below,
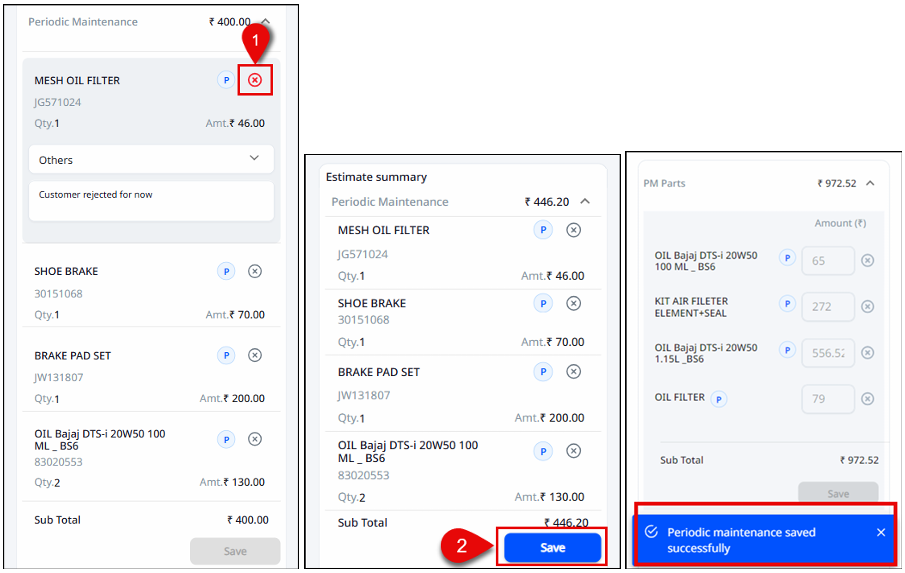
Periodic Maintenance (PM Parts)
This section contains all pre-selected jobs that will be performed alongside other listed job
items (1). Service Advisors can only remove the pre-selected jobs by clicking on the cross (x)
icon (2). After removing any of the service, a dropdown menu will appear. Please click on
"Select reason for rejection" and choose the appropriate reason. Then, add remarks for the
rejection of PM parts (3). In case if advisor wish to add, recently declined part or labor then,
click on ‘Add Again’ (4). Finally, click the "Save" button to finalize this task (5).
Additionally, this section provides detailed information about each job item with P – Part / L – Labor tags, their respective code, cost and quantity (6).
Further to check detailed Part/Labor price break up and applicable tax charges for any of the listed job items. Click on arrow next to expected part/labor (1). A window will pop up, click on ‘See summary’ for detailed applied charges (2).
Standard Additional Jobs
In Standard Additional Jobs (1) advisor can select any of listed standard job. Click on Standard additional job section, select any of the required standard job item (2) from the list scroll down and click on ‘Save’ button provided at right bottom corner for this task (3).
Additionally, each job item provides detailed information about each Part / Labor with quantity and their respective cost.
Further to check detailed Part/Labor price break up and applicable tax charges for any of the listed job items. Click on arrow next to expected part/labor (1). A window will pop up, click on ‘See summary’ for detailed applied charges (2).
Steps 20 & 21: Vehicle PrecheckFor vehicle precheck, it is mandatory to record the 'Fuel/Battery Indicator' level. Please select the accurate level of fuel indicated on the vehicle dashboard.
Steps 22: If necessary, enter other details such as,
• Vehicle Condition – Left View, Right View, Top View - Mark vehicle condition by three different views in Scratch, Damage, Missing categories.
• Battery - Enter Battery number
• Tyers Pressure - Note Front and Rear Tyre pressure
• Service Advisor Observation - Add a SA comment/SA observation images.
Save the entered information by clicking on the save button located in the bottom right corner
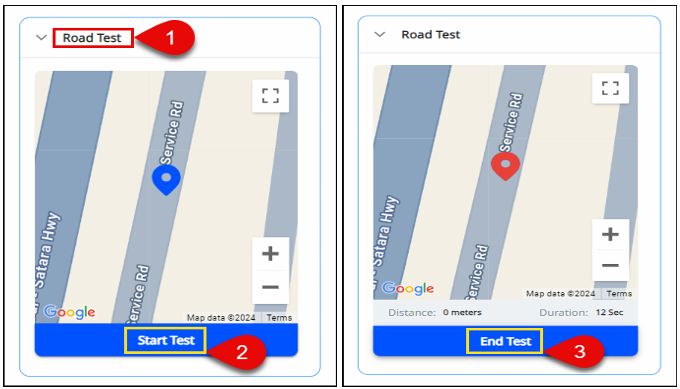
of the same functionality.Road Test
This feature enables advisors to conduct real-time road tests on vehicles. Throughout the road
test (1), the distance covered will be automatically captured and displayed on the provided
maps in meters, minutes, and seconds. Start the road test by selecting 'Start Test’ (2) and
conclude the test by clicking on 'End' (3), this will continue the automatic distance capturing
feature.
Additional Jobs
To include additional parts or labor, the service advisor can access the 'Additional Job' section.
In this section, the advisor can add jobs by selecting either 'Parts' or 'Labor'. To add a part or
labor, simply click on the respective option (1). Then, search by entering the name of the
desired part or labor in the provided field, which will display a dropdown list of relevant
options. Select the required part from the dropdown list (2). Then, click on the 'Save' button
located in the bottom right corner to complete this task (3).
On addition of part job type in additional jobs, service advisor can modify (add or remove) auto
filled part quantity as per requirements. Search and enter the required part modify the
quantity if required. Click on ‘Save’ to save the changes.
Note: In the Additional Jobs section for Commercial Vehicles (CV), the service advisor can
add Engine Overhaul related job items only if the job card's service type is set to Engine
Overhaul. In case if nonrelevant job item is added then application will show following
notification.
Step 23: To proceed, enter the necessary information in the 'Service Details' section and then
select the 'Save and Next' button located at the bottom of page. This action will direct the user
to the summary.
Steps 24 & 25: After clicking on ‘Save and Next’ on
the next page, the service advisor has the ability to
view and update customer information by using
‘pen’ icon.
Below customer information vehicle details
section is provided. Here, user can check and
confirm vehicle details such as vehicle registration
number, Engine number, sale date and chassis
number.
Additionally, user has ability to check past
servicing history of selected vehicle by clicking on
Vehicle History/Service History.
Table of Contents
Service Estimate print
This section explains how to generate and download a service estimate print in the application.
1. On the Service Estimate page, In the top-right corner of the screen, select the More
Options (three-dot menu) button.
2. Select Print to get a printout of service estimate or click Download to download the
service estimate.
3. Select suitable option Download/Print.
• The service estimate print/download include:
o Vehicle details
o Estimate details
o Customer voice
o Labor details
o Part details
o Estimation summary
o Estimated billing summary
o Customer signature
o Customer voice
o Labor details
o Part details
o Estimation summary
o Estimated billing summary
o Customer signature
Vehicle History
Service History
This section describes how to access and review the service history and contract details for a
vehicle by following below steps.
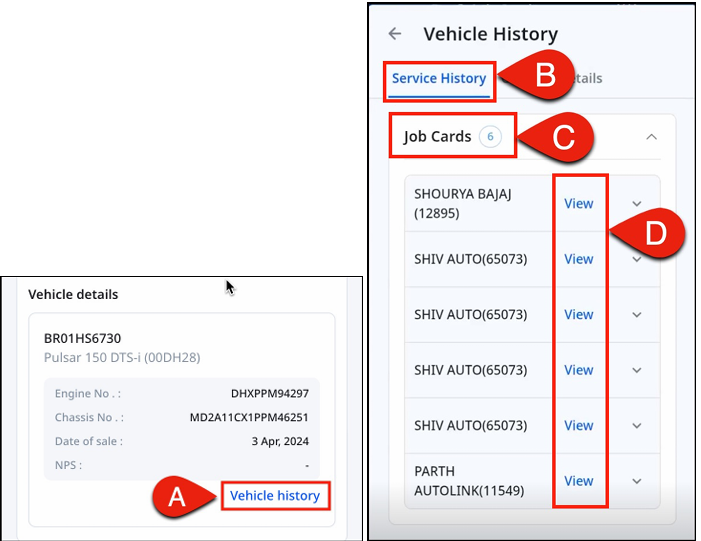
• Vehicle/Service History: Displays past service records for the vehicle.
A. Open the Vehicle/Service History
B. Select the Service History tab.
C. open the Job Cards dropdown to view job cards created under different dealerships.
D. To view a specific job card, select View. The selected job card details will be displayed.
In selected job card, user can check customer complaints, Part details, Labor details.
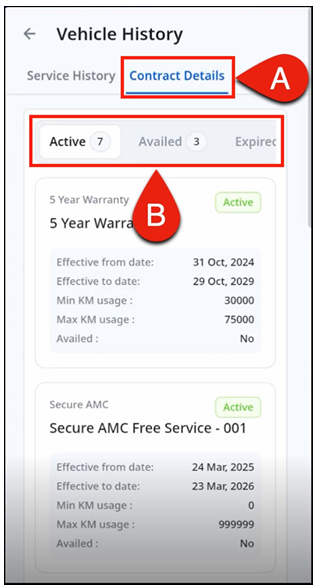
Contract Details
Contract Details: Displays contract information for the vehicle.
A. Select the Contract Details tab.
B. Review the following contract sections:
A. Select the Contract Details tab.
B. Review the following contract sections:
o Active – Lists contracts currently active for the vehicle.
o Availed – Lists contracts that have been used.
o Expired – Lists contracts that are no longer valid
o Availed – Lists contracts that have been used.
o Expired – Lists contracts that are no longer valid
Steps 26 & 27: Here, advisor has ability to accept or reject & make changes in parts and/or
labor of Periodic Maintenance (PM) Parts, Customer VOC Job Items, Standard Jobs, Additional
Jobs. Based on the modifications in the parts and labors of any of the parameters the
respective total estimation cost will change respectively. Let’s learn about how to modify or
change the parameters in detail as below,
Note: It must obtain the customer's approval before making any changes to parts and/or
labor of PM Parts/ Customer VOC job items/ Standard Additional Jobs and Additional jobs
(as detailed in step 34).
Accept or Decline Parts / Labour
In PM Parts / Customer VOC job items / Standard Additional Jobs and Additional jobs, the advisor has the ability to review and decline or accept job items.
Decline the Parts / Labour
• To decline a previously selected job item, follow these steps:
1. Open the service section in which part / labor is required to be declined. Click the gray cross icon next to the job item which was included and now wishes to decline.
2. Click the dropdown and select the appropriate reason for rejecting the job item.
3. Add a comment or remark for the selected rejection reason.
4. Click the Save button at the bottom of the same section.
1. Open the service section in which part / labor is required to be declined. Click the gray cross
2. Click the dropdown and select the appropriate reason for rejecting the job item.
3. Add a comment or remark for the selected rejection reason.
4. Click the Save button at the bottom of the same section.
By following these steps, the advisor has successfully declined the selected job item in PM
Parts / Customer VOC job items / Standard Additional Jobs and Additional jobs.
Additionally, the advisor can also accept job items that were previously declined.
Accept the Parts / Labour
• To accept a previously or recently declined job item, follow these steps:
1. Open the service section in which part / labor is required to be accepted. Select the previously/recently declined job item which is required to include. Click the red cross icon next to it. The job item will then be accepted for service, and any previous rejection reasons and comments will be removed.
2. After selecting and accepting the previously declined job items, click the Save button at the bottom of the same section. A successful notification will appear upon completing the modification.
By following these steps, the advisor has successfully accepted the selected job item in PM
Parts / Customer VOC job items / Standard Additional Jobs and Additional jobs which was
previously or recently declined.
Change/Enter Labour Cost
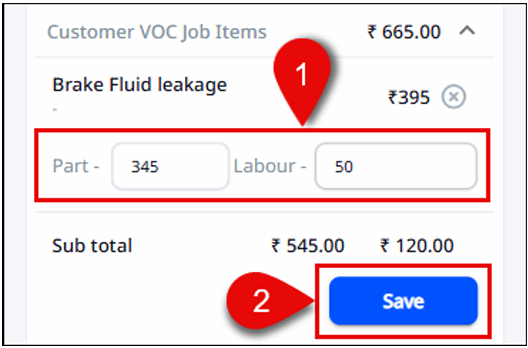
• In Customer VOC Job Items: In the ‘Job Items section’, the advisor can add costs for parts and labor individually for each
pre-selected item. To add costing for pre-selected items, follow these steps:
1. Open the Job Items section. Enter the cost for parts and labor for each pre-selected job item individually.
2. Click the Save button at the bottom of the ‘Job Items section’.
1. Open the Job Items section. Enter the cost for parts and labor for each pre-selected job item individually.
2. Click the Save button at the bottom of the ‘Job Items section’.
• In Additional Jobs:
Advisor can make changes to the auto filled labor cost of the added parts. To change the labor
cost, click on cost of labor which is editable (1). Renter the corrected amount of labor (2). Click
on ‘Save’ button provided at bottom of same section (3).

Note: It must obtain the customer's approval before making any changes to parts and/or
labor of PM Parts/ Customer VOC job items/ Standard Additional Jobs and Additional jobs
(as detailed in step 34).
Delivery Time & Customer Approval
Steps 28, 29, & 30: Next advisor can check for ‘Vehicle Precheck’ details. Additionally, the cost
estimation section will provide the total estimated cost of parts and labor. In the estimated
delivery time section, the advisor will provide a tentative timeframe for when the vehicle will
be ready for delivery. It is mandatory to schedule a delivery time and date, click on the field
below.
Steps 31, 32, & 33: After clicking on the "Estimated Delivery Time" field, a window will appear. Within this window, the user can select the desired date using the calendar symbol (31) and the desired time using the clock symbol (32). Please be mindful to choose a working day and working office hours when selecting the date and time. To schedule the delivery, simply click on the "OK" button located in the bottom right corner of the screen (33).
Steps 31, 32, & 33: After clicking on the "Estimated Delivery Time" field, a window will appear. Within this window, the user can select the desired date using the calendar symbol (31) and the desired time using the clock symbol (32). Please be mindful to choose a working day and working office hours when selecting the date and time. To schedule the delivery, simply click on the "OK" button located in the bottom right corner of the screen (33).
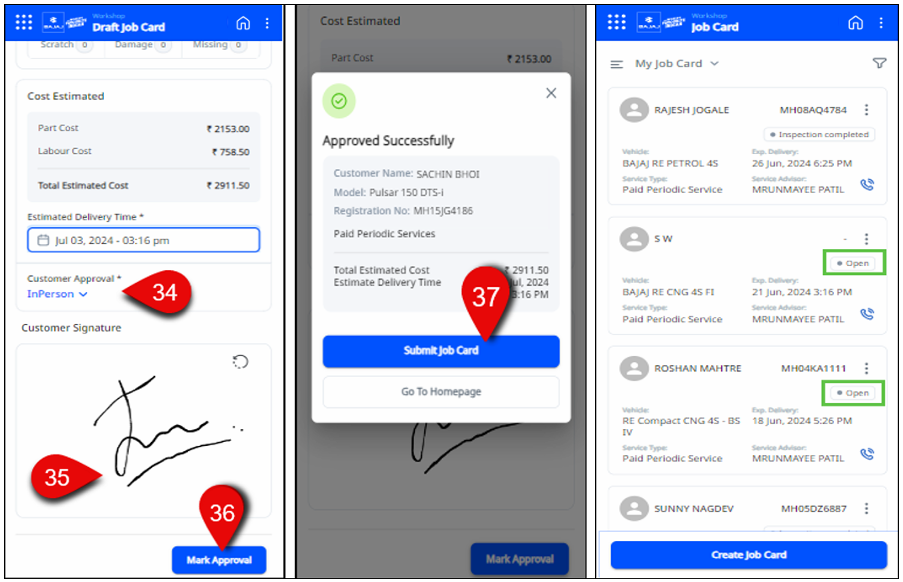
Steps 34, 35 & 36: Once the date and time for delivery have been determined, it is important
to obtain the client's approval. Advisors can seek approval either in person or over a call, based
on the client's availability. Subsequently, the service advisor will sign in the provided empty
box and then click on 'Mark Approval'.
The "Approved Successfully" window will appear, providing the service advisor with two options. They can either create a job card by clicking the "Submit Job Card" button, or they can select "Go to Homepage" to access the summary estimate window.
Now, Select the 'Submit Job Card' button. Congrats! Advisor has successfully created and submitted a job card.
Step 37: Please select 'Submit Job Card' to proceed. To view a created job card, navigate to Dashboard > Side bar menu > Workshop > Job card. Follow these steps to work on any created job cards and check their respective status (e.g., Open, Work in Progress, Work completed, Final Inspection, Inspection completed, Rework, Ready for Invoice, Invoiced, Delivered, Cancelled). Choose the job card with the 'Open' status to continue.
Technician Assignment Header and Line Level
This section explains how to assign or modify a technician at both the header and line levels in a job card.
1. On the Dashboard, select the Open job Card.
2. Open the required job card.
3. On the General tab, review the Customer, Vehicle, Service, Work Allocation, and other details.
4. To assign a technician:
1. Select the Technician field.
2. From the list of technicians, select the appropriate technician.
3. Save the job card.
5. The assigned header-level technician will be applied to both Part and Labor grids.
6. To modify the technician at line level:
1. Open the Part grid and expand the required part.
2. Select the Technician field and choose the desired technician.
3. Repeat the same steps for the Labor grid.
7. Save the job card.
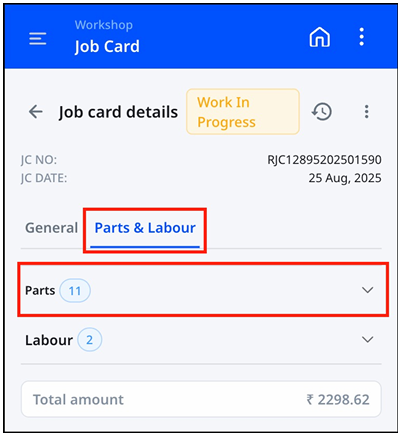
Part Grid Feature This section explains how to manage parts within a job card, including viewing, modifying, and
deleting parts, as well as checking price breakups.
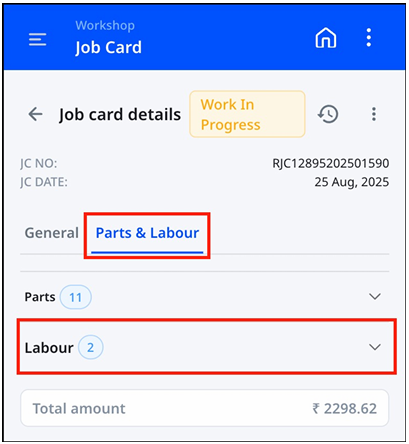
In the Part and Labor tab, two grids are displayed: Parts and Labors.
To view the list of parts, expand the Parts grid.
• Delete a part: Select the part and choose Delete. The selected part will be removed.
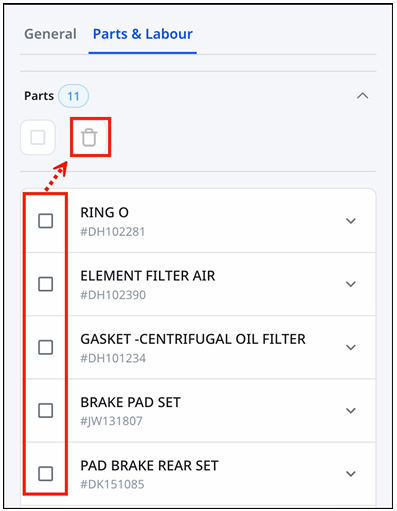
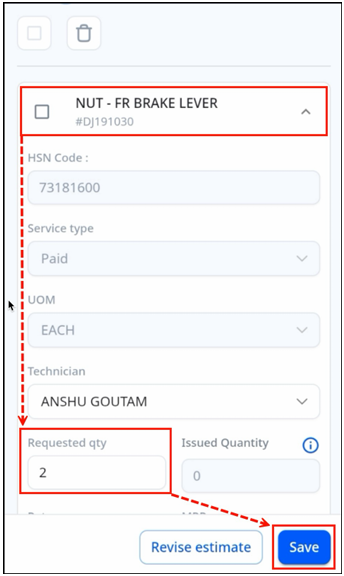
• Modify requested quantity: Expand the part, select the Requested Quantity field, enter the new value, and select Save. Changes are subject to the model–part relation.
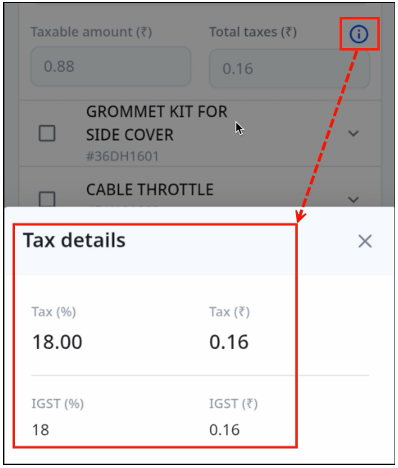
• View price breakup: Select the Information (i) icon next to the Total Taxes field. A pop-up displays the percentage tax and the corresponding amount.
• Delete a part: Select the part and choose Delete. The selected part will be removed.
• Modify requested quantity: Expand the part, select the Requested Quantity field, enter the new value, and select Save. Changes are subject to the model–part relation.
• View price breakup: Select the Information (i) icon next to the Total Taxes field. A pop-up displays the percentage tax and the corresponding amount.
Labour Grid Feature
This section explains how to manage labour within a job card, including viewing, modifying,
updating and deleting parts, as well as checking price breakups.
1. Go to the Part and Labor tab and expand the Labor grid. The list of labours appears.
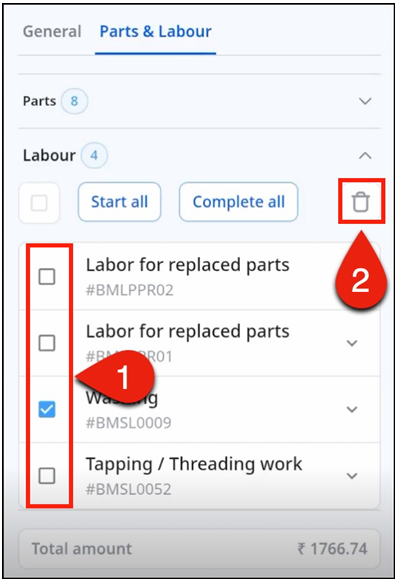
2. To delete a labour:
2.1 Select the labour.
2.2 Select the Delete button above the labour list.
2.3 The labour is deleted.
3. To modify the labour rate:
3.1 Expand the required labour.
3.2 Select the Rate field and enter the new amount, subject to Min-Max rate configuration.
3.3 Save the changes.
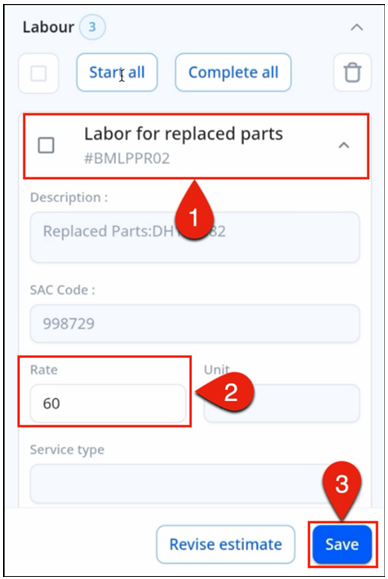
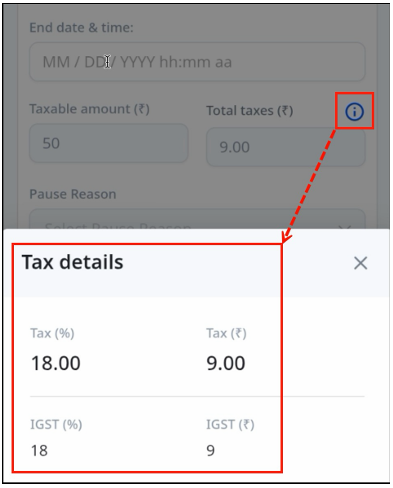
4. To view the price breakup:
4.1 Select the Information (i) button next to the Total Taxes field.
4.2 A pop-up appears showing the tax percentage and relevant amount.
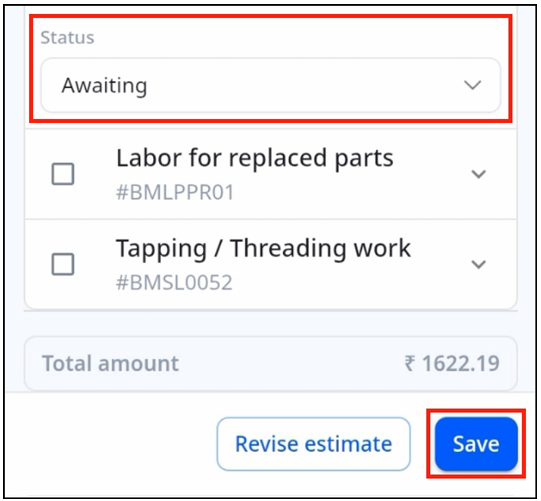
5. To modify the labour status:
5.1 Select the Status field. 5
5.2 Change the status to the required option (for example, Awaiting).
5.3 Save the changes.
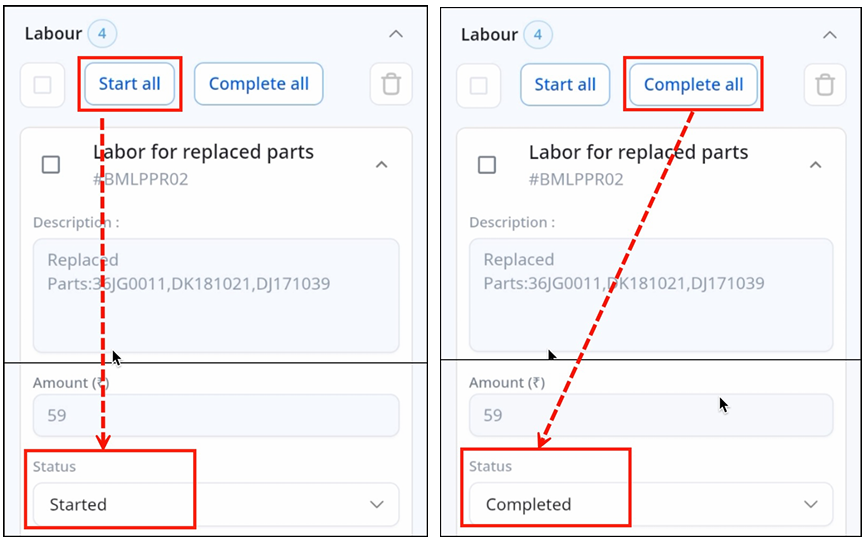
6. To update all labours at once:
o Select Start All to change the status and start all labours.
o Select Complete All to change the status and complete all labours.
1. Go to the Part and Labor tab and expand the Labor grid. The list of labours appears.
2. To delete a labour:
2.1 Select the labour.
2.2 Select the Delete button above the labour list.
2.3 The labour is deleted.
3. To modify the labour rate:
3.1 Expand the required labour.
3.2 Select the Rate field and enter the new amount, subject to Min-Max rate configuration.
3.3 Save the changes.
4. To view the price breakup:
4.1 Select the Information (i) button next to the Total Taxes field.
4.2 A pop-up appears showing the tax percentage and relevant amount.
5. To modify the labour status:
5.1 Select the Status field. 5
5.2 Change the status to the required option (for example, Awaiting).
5.3 Save the changes.
6. To update all labours at once:
o Select Start All to change the status and start all labours.
o Select Complete All to change the status and complete all labours.
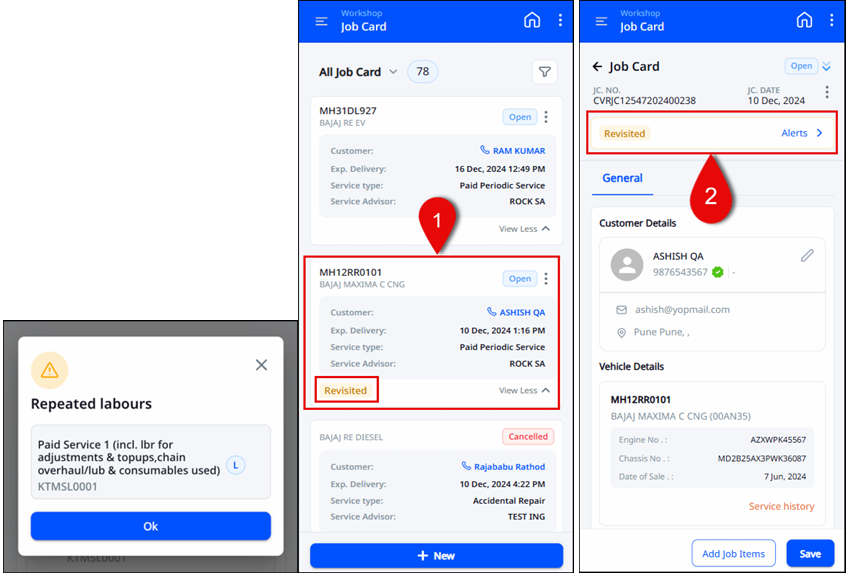
Table of ContentsRevisit Status
When a customer revisits the service station for a new service request. Such as replacing or
repairing a part of newly identified issue, the job card status becomes "Revisited". This feature
helps track the reason for the revisit. The service advisor can add remarks under
"Observation."
Follow these steps to use the "Revisited" feature:
1. Create a new job card for same vehicle and job card will show alert as "Revisited" on creation.
2. Then click the alert showing the "Revisited" status to open it.
3. Review the alert details and add the service advisor's remarks under "Observations."
4. Click Save to save the remarks and observations, then close the window.
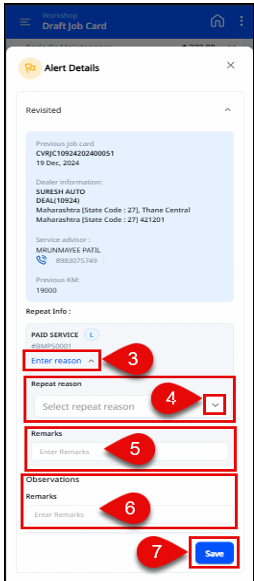
Repeat Status
When a customer revisits the service station for a rework of recently serviced vehicle. For
issues such as repeating or repairing a part/labor of a recently resolved issues in the last
servicing. The job card status becomes "Revisit" and type becomes ‘Repeat’. A pop-up
notification will appear notifying repeated labor/parts. This feature helps track the reason for
the revisit and repeat work done in servicing. The service advisor can add remarks under
"Observation."
Follow these steps to use the "Revisit - Repeat" feature:
1. Create a new job card for same vehicle and job card will show alert as "Revisited" on creation.
2. Then click the alert showing the "Revisited" status to open it.
3. Review the alert details and click on the ‘Enter Reason’ given under repeat info for mentioned part or labour which is undergoing rework.
4. Click the dropdown to select the repeat reason.
5. Give remark for the selected repeat reason.
6. Advisors can add remarks for any of the observations.
7. Click Save to save the remarks and observations, then close the window.
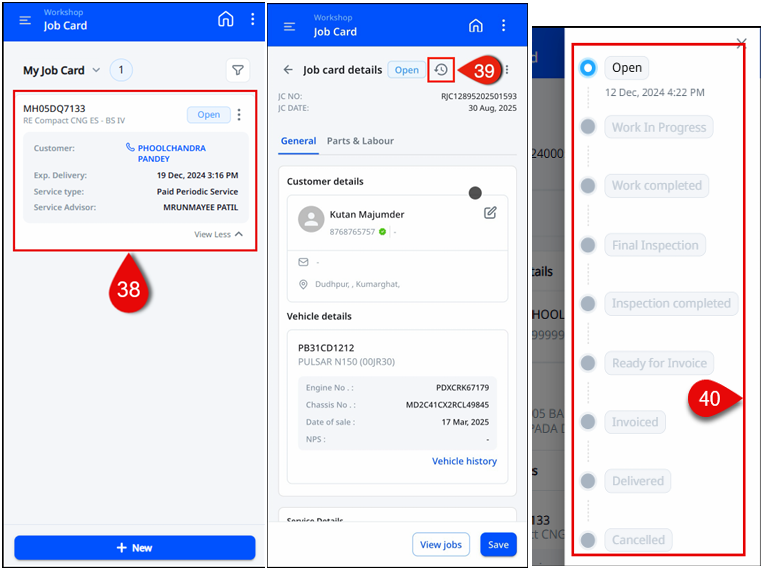
Job card StatusStep 38: To view a created job card, navigate to Dashboard > Side bar menu > Workshop > Job
card. Follow these steps to work on any created job cards and check their respective status
(e.g., Open, Work in Progress, Work completed, Final Inspection, Inspection completed,
Rework, Ready for Invoice, Invoiced, Delivered, Cancelled). Choose the job card with the 'Open'
status to continue.
Step 39 & 40: Once the job card is opened, the service advisor can view real-time statuses of the job card using the downward dropdown arrow icon. These statuses include Open, Work In Progress, Work Completed, Final Inspection, Inspection Completed, Rework, Ready for Invoice, Invoiced, Delivered, and Cancelled. The statuses are seamlessly synced with the CDMS job card with respect to its time, date, and other work details.
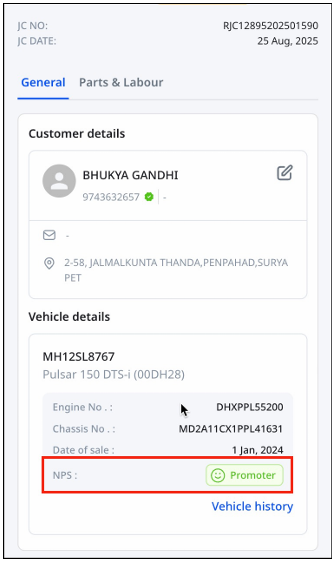
Customer NPS
A job card can have one of three Net Promoter Score (NPS) values - Promoter, Passive, or Detractor—based on the customer’s feedback from their most recent dealership service.
Step 39 & 40: Once the job card is opened, the service advisor can view real-time statuses of the job card using the downward dropdown arrow icon. These statuses include Open, Work In Progress, Work Completed, Final Inspection, Inspection Completed, Rework, Ready for Invoice, Invoiced, Delivered, and Cancelled. The statuses are seamlessly synced with the CDMS job card with respect to its time, date, and other work details.
Customer NPSA job card can have one of three Net Promoter Score (NPS) values - Promoter, Passive, or Detractor—based on the customer’s feedback from their most recent dealership service.
Job Card Print/Download
Steps to View and Print a Job Card:
1. In the top-right corner, select the three dots (⋮) menu.
2. Select Print.
3. Select Job Card Print.
4. Select Download or Print.
Job Card Print Content:
The downloaded job card includes the following information:
• Customer details
• Vehicle details
• Job card details
• Customer voice details
• Last two visit details
• Allocation details
• Estimation details
• Vehicle inspection details
The second page contains:
• Part details
• Labor details
Customer signature section
• Customer details
• Vehicle details
• Job card details
• Customer voice details
• Last two visit details
• Allocation details
• Estimation details
• Vehicle inspection details
The second page contains:
• Part details
• Labor details
Customer signature section
View and Add Jobs
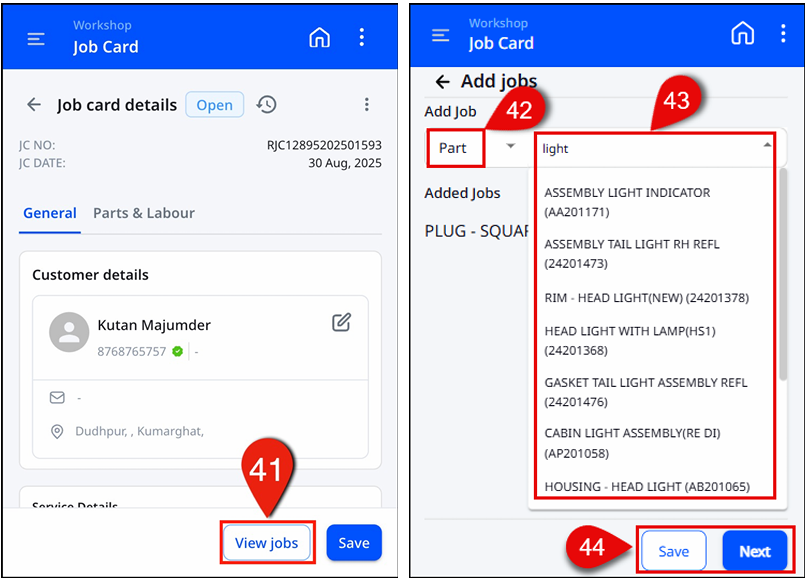
Step 41, 42 & 43, 44: The "Add New Jobs" button allows the services advisor to include additional new jobs on the
job card. After clicking on this button, a window will open, presenting the advisor with the
options to search for either a "Part" or "Labor" job. Advisor can then select the desired part
or labor from the search results. Once the job(s) have been added, they can click on either the
‘Save’ and ‘Next’
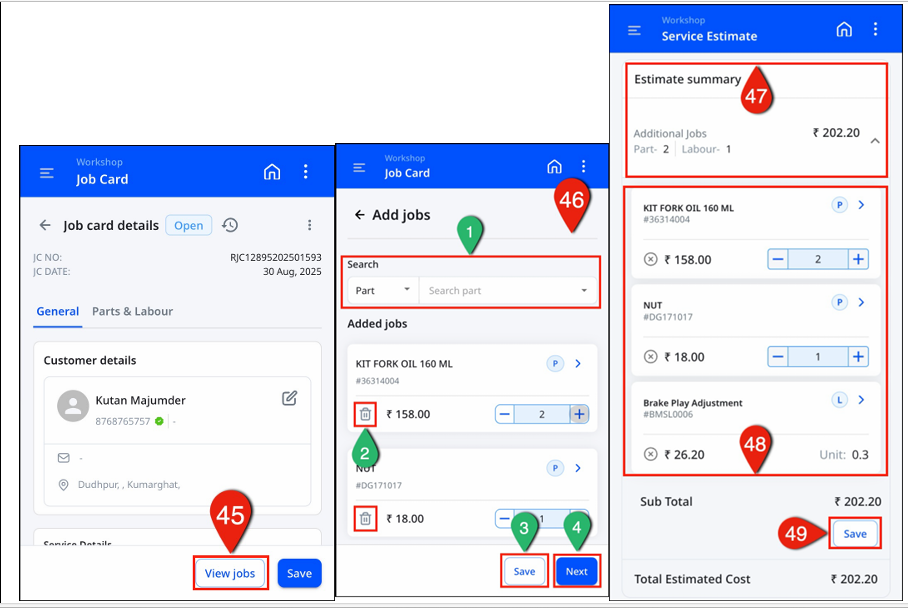
Step 45 & 46: Recently added parts and/or labor will be displayed here (45). Advisors have the ability to add or remove jobs if needed (1 or 2). Click 'Save' to save any modifications made to the jobs (3). To obtain a Revised New Service Estimate, click ‘Next’ (4)[46]. On the summary estimate page, the advisor must obtain approval from the customer regarding any newly added parts and/or labor jobs and the click on ‘Generate Estimate’.
Step 47, 48 & 49: Here on the ‘Estimation' page, the service advisor is required to double-check all customer and vehicle details. Any revised or pre-selected job items will be listed with their corresponding amounts.
If the amount for additional job charges does not automatically appear, the advisor should manually input the charges/amount. Additionally, if the amount for a job is in read-only mode and automatically appears, the advisor should verify any revised amounts.
This will provide a subtotal of the charges. Finally, the advisor should click on the 'Save' button to confirm the total charges amount.
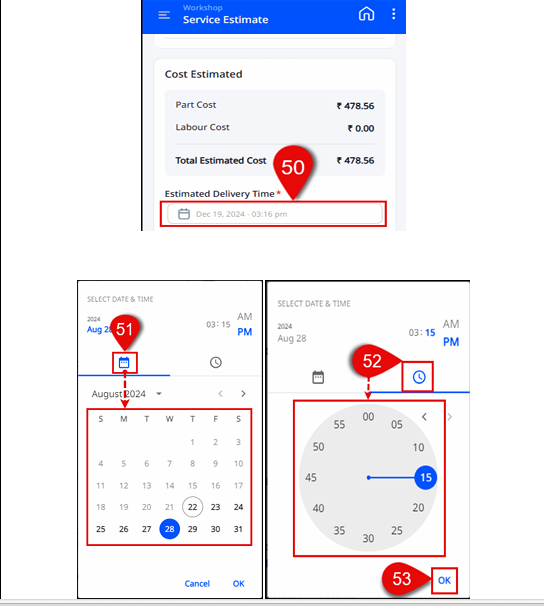
Step 50, 51 & 52, 53: On the service estimation page, advisor need to set ‘Estimated Delivery Time’ field on click a window will pop up. In the window, advisors can select the date using the calendar symbol and the time using the clock symbol. It is important to select a working day and office hours when choosing the date and time. To schedule the delivery, simply click on 'OK' at the bottom right of the screen.
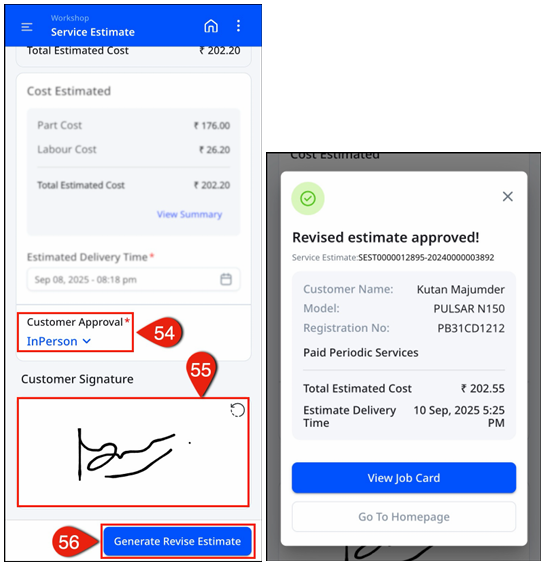
Steps 54, 55 & 56: Once the date and time of delivery are determined, it is time to obtain the client's approval. The advisor can request this approval in person or through a phone call, depending on the client's availability. After receiving the approval, the service advisor will sign in the designated empty box and then click on the "Generate Revise Estimate" button.
Once the revise estimate is generated, click on ‘View job Card’ for further job card details.
Step 57 & 58: ‘Service Details’ displays important information such as service type, odometer reading, estimated delivery time and date of delivery. ‘Work Allocation’ serves the purpose of assigning various roles such as Technician, Floor supervisor. ‘Campaign’ details section allows user to enter any applicable campaign details. ‘UCN’ details is useful to enter applicable UCN code details. ‘Customer Complaints’ is essential to make a note of customer voice.
Please review all the mentioned fields and make the necessary modifications based on the specific scenario. Ensure that all mandatory fields are filled out and then click on the "Save" button located in the bottom right corner of the screen.
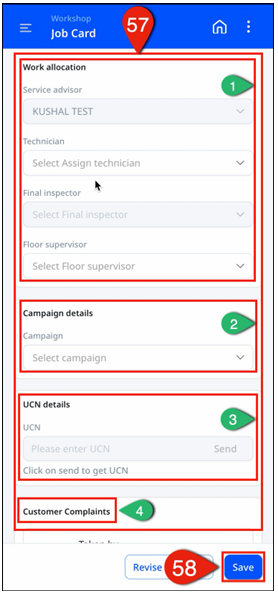
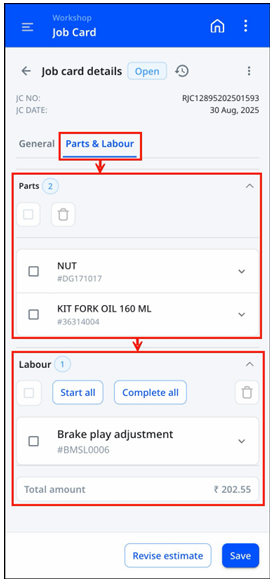
Additionally, Service advisor can view all parts and labor with their respective code in job card at one click in ‘Part & Labor’ section.
Step 45 & 46: Recently added parts and/or labor will be displayed here (45). Advisors have the ability to add or remove jobs if needed (1 or 2). Click 'Save' to save any modifications made to the jobs (3). To obtain a Revised New Service Estimate, click ‘Next’ (4)[46]. On the summary estimate page, the advisor must obtain approval from the customer regarding any newly added parts and/or labor jobs and the click on ‘Generate Estimate’.
Step 47, 48 & 49: Here on the ‘Estimation' page, the service advisor is required to double-check all customer and vehicle details. Any revised or pre-selected job items will be listed with their corresponding amounts.
If the amount for additional job charges does not automatically appear, the advisor should manually input the charges/amount. Additionally, if the amount for a job is in read-only mode and automatically appears, the advisor should verify any revised amounts.
This will provide a subtotal of the charges. Finally, the advisor should click on the 'Save' button to confirm the total charges amount.
Step 50, 51 & 52, 53: On the service estimation page, advisor need to set ‘Estimated Delivery Time’ field on click a window will pop up. In the window, advisors can select the date using the calendar symbol and the time using the clock symbol. It is important to select a working day and office hours when choosing the date and time. To schedule the delivery, simply click on 'OK' at the bottom right of the screen.
Steps 54, 55 & 56: Once the date and time of delivery are determined, it is time to obtain the client's approval. The advisor can request this approval in person or through a phone call, depending on the client's availability. After receiving the approval, the service advisor will sign in the designated empty box and then click on the "Generate Revise Estimate" button.
Once the revise estimate is generated, click on ‘View job Card’ for further job card details.
Step 57 & 58: ‘Service Details’ displays important information such as service type, odometer reading, estimated delivery time and date of delivery. ‘Work Allocation’ serves the purpose of assigning various roles such as Technician, Floor supervisor. ‘Campaign’ details section allows user to enter any applicable campaign details. ‘UCN’ details is useful to enter applicable UCN code details. ‘Customer Complaints’ is essential to make a note of customer voice.
Please review all the mentioned fields and make the necessary modifications based on the specific scenario. Ensure that all mandatory fields are filled out and then click on the "Save" button located in the bottom right corner of the screen.
Additionally, Service advisor can view all parts and labor with their respective code in job card at one click in ‘Part & Labor’ section.
View Summary
Step 59: To view and access the 'Summary' and 'Estimates' sections, simply click on the
ellipsis/three dots menu located below the latest status of the job card.

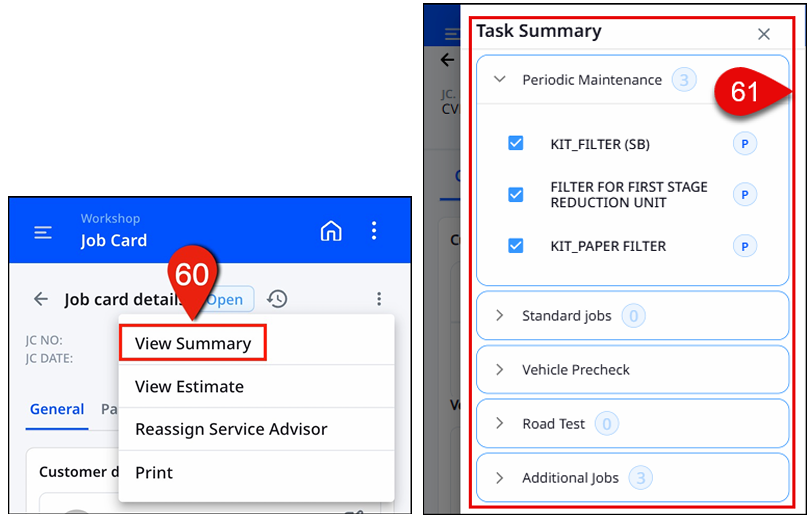
Step 60 & 61: By selecting ‘View Summary’ from the ellipsis/three dots menu, the user will see a pop-up window with two options: 'Task summary'. Choose the first option from the menu labeled as 'View Summary'.
This will open a task summary page, where users can review and verify the task summary for individual tasks in their respective dropdowns. For more information on the task summaries, refer to Step 19 in route 2.
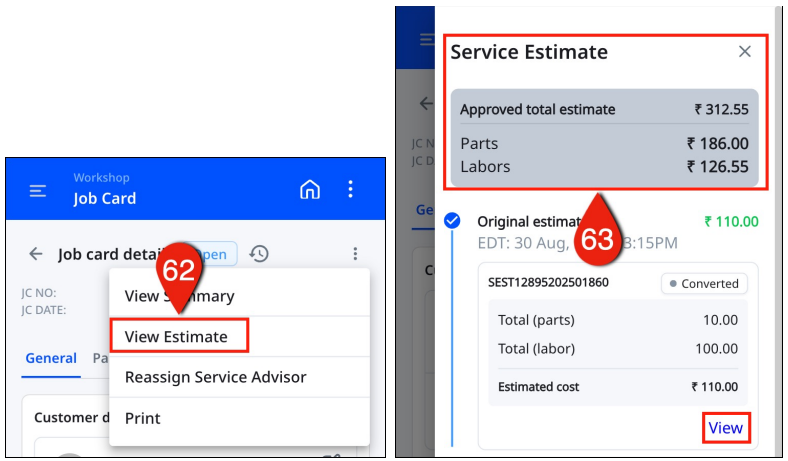
View Service EstimateStep 62 & 63: To access detailed estimates, please click on the "View Estimate" option. This will
lead the user to the summary page titled "Estimate".
On this page, users will be able to review both the original and revised estimates, if any. To view a specific estimate in greater detail, simply click on "View" respectively. Additionally, this page provides the user with a clear breakdown of the total estimated cost, including separate sections for parts and labor charges.
On this page, users will be able to review both the original and revised estimates, if any. To view a specific estimate in greater detail, simply click on "View" respectively. Additionally, this page provides the user with a clear breakdown of the total estimated cost, including separate sections for parts and labor charges.
-: Thank You :-
Table of Contents
Final Inspection Login to Final inspector & iDMS Dashboard
There are two routes to login into iDMS as a ‘Final Inspector’.
Route One: To accommodate cases where a single individual takes on both the Service Advisor and Final Inspector roles, there is a feature available in the Service Advisor iDMS web application.
This feature enables users to switch between the Service Advisor and Final Inspector roles by
accessing the "My Profile" option. By utilizing this feature, individuals can easily transition
between the two roles within the application.
Route Two: To access the BAJAJ iDMS platform for final inspection, visit the website at “https://bal-idms.excellonconnect.com/”. This link will lead to the login window of the iDMS platform design for final inspection.
On login page follow the below steps,
Step 1: Enter mobile number.
Step 2: Click "Send OTP" to have a one-time password (OTP) sent to the provided valid mobile number. If the user does not receive the OTP, please click "Resend OTP"
Step 3: Enter the received OTP in the given field.
Step 4: Please click on the "Sign In" button. Upon completing these steps, the user will be redirected to the dashboard, which is depicted in the last slide. By following these instructions, users will be directed to the final inspector dashboard, as shown in the last slide below.
iDMS dashboard has many functionalities and tabs to keep track of routine activities. Follow the steps below to learn more about each tab and its use.
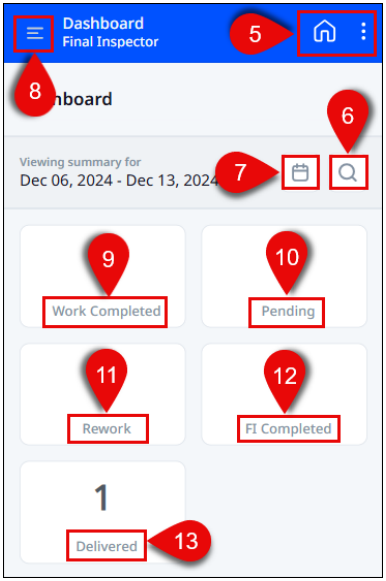
Step 5: Home and My Profile: Home button
allows user to jump on dashboard menu
button
allows user to jump on dashboard menu  . With
ellipsis/vertical three dots feature enables users
to access and handle their user profiles. This
includes managing profile settings, changing
passwords, and adjusting general settings.
Users can also switch between different user roles
such as Service Advisor and Final Inspector.
Additionally, they have the option to request
assistance and log out of the system.
. With
ellipsis/vertical three dots feature enables users
to access and handle their user profiles. This
includes managing profile settings, changing
passwords, and adjusting general settings.
Users can also switch between different user roles
such as Service Advisor and Final Inspector.
Additionally, they have the option to request
assistance and log out of the system.
Step 6: Search Icon: Using Search icon user can search for a specific job card of final
inspection by options such as VIN number, Registration number, Customer name.
user can search for a specific job card of final
inspection by options such as VIN number, Registration number, Customer name.
Step 7: Calendar: Utilize the calendar to check the status of job cards by date. Users can view data for up to 30 days prior to and after the selected date, including statuses such as pending, completed, and rework.
Step 8: Sidebar: The sidebar provides navigation options for the dashboard and
workshop. Within the workshop section, users can access the final inspection records
provides navigation options for the dashboard and
workshop. Within the workshop section, users can access the final inspection records
Step 9: Work Completed: Track all job cards awaiting final inspection.
Step 10: Pending: Job cards will list items that require rework, based on the identification of issues during the final inspection. These cards will be categorized under the rework section.
Step 11: Rework: Upon completing the final inspection and confirming that no rework is required, job cards will be located under the category of "complete."
Step 12: FI (Final Inspection) Completed: To track all job card with status as final inspection completed.
Step 13: Delivered: To track all job cards with status as delivered.
Route Two: To access the BAJAJ iDMS platform for final inspection, visit the website at “https://bal-idms.excellonconnect.com/”. This link will lead to the login window of the iDMS platform design for final inspection.
On login page follow the below steps,
Step 1: Enter mobile number.
Step 2: Click "Send OTP" to have a one-time password (OTP) sent to the provided valid mobile number. If the user does not receive the OTP, please click "Resend OTP"
Step 3: Enter the received OTP in the given field.
Step 4: Please click on the "Sign In" button. Upon completing these steps, the user will be redirected to the dashboard, which is depicted in the last slide. By following these instructions, users will be directed to the final inspector dashboard, as shown in the last slide below.
iDMS dashboard has many functionalities and tabs to keep track of routine activities. Follow the steps below to learn more about each tab and its use.
Step 5: Home and My Profile: Home
Step 6: Search Icon: Using Search icon
Step 7: Calendar: Utilize the calendar to check the status of job cards by date. Users can view data for up to 30 days prior to and after the selected date, including statuses such as pending, completed, and rework.
Step 8: Sidebar: The sidebar
Step 9: Work Completed: Track all job cards awaiting final inspection.
Step 10: Pending: Job cards will list items that require rework, based on the identification of issues during the final inspection. These cards will be categorized under the rework section.
Step 11: Rework: Upon completing the final inspection and confirming that no rework is required, job cards will be located under the category of "complete."
Step 12: FI (Final Inspection) Completed: To track all job card with status as final inspection completed.
Step 13: Delivered: To track all job cards with status as delivered.
Perform Final Inspection
Step 1: Upon successful login, the user will be directed to the dashboard of the iDMS web
application for final inspection. To access the desired sections, simply click on the sidebar
located on the left-hand side. This action will navigate the user to the 'Dashboard' and
'Workshop' dropdown menus.
Step 2: To access the 'Final Inspection' option, simply click on the 'Workshop' dropdown. Once
selected, the inspector will be able to view the available job cards.
Step 3: The inspector can check their own job cards for inspection, as well as job cards
assigned to other individual inspectors at the service station, by selecting the corresponding
option in the dropdown menu.
Step 4: After completing Step 3 to verify the 'My Job Card' or 'All Job Card', proceed to select
and click on one of the dropdown options. The final inspector will be able to view all job cards
along with their corresponding status.
Step 5: A filter option is available for users to search job cards using different combinations of
filters.
Step 6: A filter including Branch, Job Card Status (Final inspection, inspection completed, rework), Service Type, Vehicle, and Job Card Date [1 to 5]. To sort the job cards based on specific criteria, the user needs to select and complete the necessary details in the filters. Afterward, simply click the 'Apply' button.
Step 7 & 8: By utilizing the ellipses/three-dot menu on the assigned job card, the final
inspector can access the options to 'View Summary', 'View Estimate' details, and 'Reassign
Final Inspector' if necessary for a specific job card (7). Additionally, the status of the job card
is displayed below the ellipses/three-dot menu. To communicate with customers regarding
any service or job card-related discussions, the final inspector can simply click on the phone
icon (8).
Step 9: Please click on the job card to inspect or obtain further details. This includes
information on the customer and vehicle, service details, as well as a task summary.
Note: ‘To understand the various functions and menu options on the Job card page, please
follow Steps 10 to 16. Additionally, to initiate the final inspection process, refer to Step 21’. Status in Final Inspection
Step 10 & 11: Once the job card is opened, the final inspector can track the status of the job
card in real-time. This can be done by using the downward dropdown arrow menu, which
displays options such as Open, Work in Progress, Work Completed, Final Inspection, Inspection
Completed, Ready for Invoice, Invoiced, Delivered, and Cancelled. The status updates are
automatically synced with CDMS, and job items can also be added.
View Summary
Step 12: To access the 'Summary' and 'Estimates' sections, click on the ellipsis icon or three dot menu located below the downward dropdown arrow menu.
Step 13 & 14: After clicking on ellipses/three dots menu a pop-up window with two options
will appear ‘Task summary’. Click on the first option from the menu as ‘View Summary’. A task
summary page will appear, here we can view, and check task summary and individual task
selected while creating job card in its respective dropdown.
Upon selecting the ellipses/three dots menu, a pop-up window displaying two options will
appear. Choose the first option labeled 'View Summary' from the menu. This action will bring
up a task summary page where the user can conveniently review the task summary and
individual tasks that were selected when creating the job card, all within their respective
dropdown menus.
View Estimate
Step 15 & 16: To access detailed estimates, click on 'View Estimate'. Here, users can view both
the original estimate as well as any revised versions. If the user wishes to examine any of the
available estimates in greater detail, simply click on 'View' (1). This page also presents the total
cost of the estimate, broken down into individual parts and labor charges.
Reassign Service Advisor
Step 17: In case of the unavailability of the final inspector, the final inspection was unable to
be performed. In these situations, there is always the option to reassign the job card to
another available final inspector. To do so, please click on step 17 to reassign the final
inspector.
Step 18, 19 & 20: Upon selecting step 17, a window will appear allowing users to reassign the
final inspector for the task. In this window, users have the option to check the inspector
currently assigned (18), reassign the task to another inspector (19), and save the details (20).
Once the new inspector is selected and the details are saved, the job card will be assigned to
the mentioned/selected final inspector.
Step 21: If the final inspector is already familiar with all functionalities from step 10 to step 20,
they can proceed by clicking on the 'Start Final Inspection' button located at the bottom right
of the screen.
Final Inspection Details
Step 22: On the final inspection page, Inspector has the option to perform a "Road Test" if
believed to be necessary. They can also approve or reject job items using the "Customer
concerns" and "FI Checklist". After completing a vehicle check according to the specified job
items, the final inspector can add an observation and save it in the comment box under "FI
observation".
Note: It must approve or reject all listed items under ‘Customer Voice’ and ‘FI Checklist’.Let’s explore and learn more about functionality of each service details as below,
Road Test
Users have the option to conduct a road test on a vehicle. During the road test, the distance
traveled will be automatically captured and displayed on the provided maps in meters, minutes,
and seconds. By clicking on 'Start', the road test will begin, and by clicking on 'End', the
automatic distance capture will conclude. The road test serves as a valuable functionality to
assess the condition of the vehicle after servicing and to observe its performance.
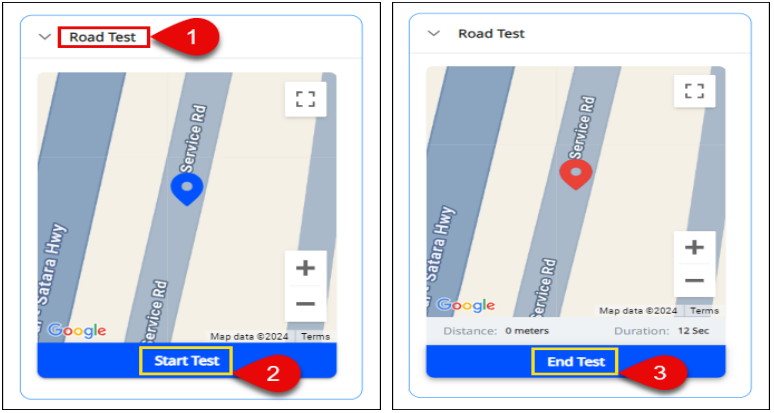
Customer Concerns
In the customer concerns section, the inspector can check concerns raised by customer (1).
Upon checking vehicle condition and performance post servicing, inspector can approve (2) or
reject (3) the mentioned customer concern with a click on any of the suitable options. If the
inspector rejects the raised concerns, then it will go under rework. Post approval or rejection
of the job item, inspector must save the changes by clicking on ‘Save’ button (4) provided at
right bottom of the same job items.
FI (Final Inspector) Checklist
The FL checklist (1) is a predefined checklist that is necessary after a vehicle has been serviced.
The final inspector will thoroughly check and test each job item listed. During this inspection,
the inspector has the authority to approve (2) or reject (3) the listed items based on careful
testing and observation. If any of the job items are declined (4), the reason for rejection must
be provided in the empty note box located below that specific item (5).
These declined job items will then undergo rework. After approving or rejecting a job item, the
inspector must save the changes by scrolling and clicking on the "Save" button located at the
bottom right of the same job items.
Note: It must approve or reject all listed items under ‘Customer Voice’ and ‘FI Checklist’.Step 23: After completing step 22 and verifying all service detail job items, the inspector can
record their own observations in the designated note section (1) under 'FI observations'.
Additionally, the inspector has the option to include up to three images (2) or a voice recording
(3) to support their observations. To save the recorded observations, simply click on the 'Save'
button located at the bottom right (4) of the screen.
Step 24: To ensure the accuracy of all job items and details, as well as the performance of the
vehicle, the user should click on 'Finish Inspection' (1). Should there be a need for any rework
based on any of the job items or the observations made during the Final Inspection, the Final
Inspector has the option to click on 'Refer Back' (2). Upon successful completion, the user will
see the 'Submitted Successfully' window, indicating that the job card status has changed from
'Final Inspection' to 'Inspection Completed'.
Rework Workflow of Final Inspection
During the final inspection process, if the final inspector rejects any job items at the service
details page (refer to step 24), the user has the ability to send the declined job items back for
rework. To reject a job item, the final inspector should click on respective section and then click
on the cross icon of job item which needs rework (1). The rejection reason should be
mentioned in the note section (2), and the changes should be saved (3). Once all the necessary
actions have been completed, the final inspector can click on 'Refer Back' (4) to initiate the
rework process.
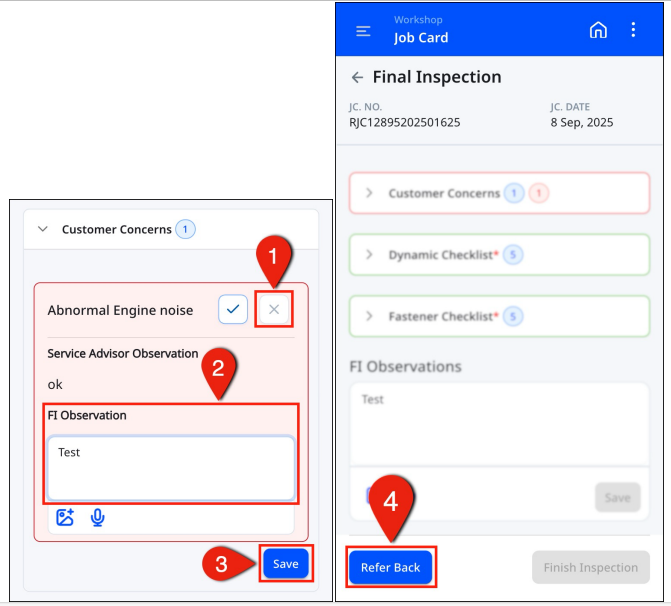
The window for sending a job card back for rework will appear. Click on "Confirm" to initiate
the rework process (5). The job card that has been sent for rework will then be visible in the
"My Job" or "All Job" card sections, with a status of "Rework" (6). At this point, the service
advisor will address the specified rework tasks, and the job card will be reassigned to the final
inspector for the final inspection process.
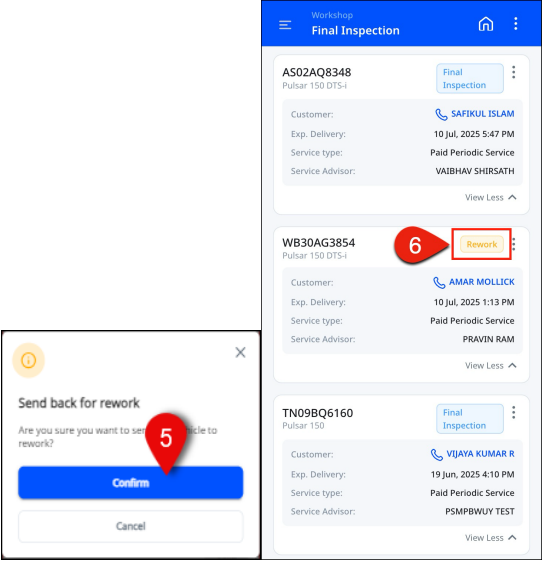
Once final inspector initiates the rework for job card, the following screen will be visible with ‘Rework’ status to Servise advisor, Floor supervisor and Final inspector.
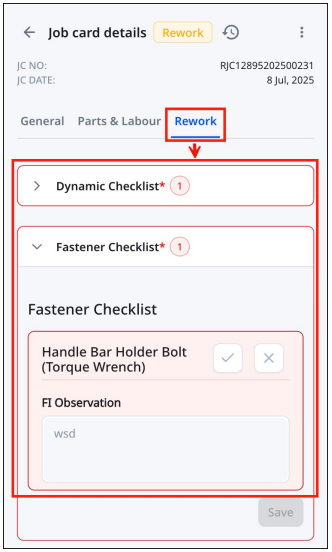
After the rework is completed, the job card will have a status of "Final Inspection." The final inspector will proceed with all the steps mentioned from 'Step 21 to Step 24'. The final inspector will conduct another inspection of all the job items to ensure that all concerns have been addressed. Following this, the job card will move forward to the billing procedure, and the status of the job card during final inspection will change to 'Inspection completed'.
-: Thank You :-
Once final inspector initiates the rework for job card, the following screen will be visible with ‘Rework’ status to Servise advisor, Floor supervisor and Final inspector.
After the rework is completed, the job card will have a status of "Final Inspection." The final inspector will proceed with all the steps mentioned from 'Step 21 to Step 24'. The final inspector will conduct another inspection of all the job items to ensure that all concerns have been addressed. Following this, the job card will move forward to the billing procedure, and the status of the job card during final inspection will change to 'Inspection completed'.
-: Thank You :-
Important LinksHere, Users can find further information and respective links related to CDMS tool.
1. How to create spare issues?
: - https://bajajsupport.excellonsoft.com/portal/en/kb/articles/how-to-creat
2. How to do issue return?
: - https://bajajsupport.excellonsoft.com/portal/en/kb/articles/how-to-do-issue-retrun
3. How to cancel the job card?
: - https://bajajsupport.excellonsoft.com/portal/en/kb/articles/how-to-cancel-the-job-card
4. How to Bill Job card?
: - https://bajajsupport.excellonsoft.com/portal/en/kb/articles/how-to-bill-job-card
5. How to add ‘Future Advice’?
: - https://bajajsupport.excellonsoft.com/portal/en/kb/articles/future-advice-sprint-41
6. How to add Root cause of repeat reason is mandatory for particular part?
: - https://bajajsupport.excellonsoft.com/portal/en/kb/articles/root-cause-of-repeat
reason-is-mandatory-for-particular-par
7. How add delay reason?
: - https://bajajsupport.excellonsoft.com/portal/en/kb/articles/mandatory-delay-reason sprint-41
8. How to edit service customer?
: - https://bajajsupport.excellonsoft.com/portal/en/kb/articles/edit-service-customer
Related Articles
Switching roles in iDMS application. (Service Advisor, Final Inspector, and Floor Supervisor)
Overview The iDMS application provides a feature that allows users to seamlessly switch between different roles assigned to their user ID. This functionality is particularly useful in cases where a single individual performs multiple ...